Combo System
The Combat Plugin has an optional yet powerful combo system that can be used to orchestrate abilities and different activation paths depending on player input.
How About AI Combos?
Even though the Combo System can work for AI agents as well, dealing with combo windows and counters for AI is very convoluted. A better approach is to create a proper State/Behavior Tree that creates the desired attack rotation for your AI.
In a Nutshell
These are the steps necessary to implement a Combo:
- Create all the Input Assets for the combo, add them to the correct Input Mapping and handle the Activation/Event logic.
- Prepare all the Animation Montages that will be used by abilities in the combo. On top of their pre-requisits for Melee or Ranged combat, they must have Combo Windows.
- Create all abilities for each state in the combo. Follow the steps for Melee and Ranged abilities.
- Design your combo flow and create the State Tree that will implement it, making sure to use the proper Evaluator, Conditions and State Task.
- Create the Data Asset representing the Combo and all input mappings that must be captured during its execution.
- Extend the default Combo Ability and assign the proper Data Asset to it.
- Assign all the abilities (combo and attacks) to the character.
Participants for the Combo System
Multiple participants are involved to in the Combo System. Here's a diagram to show you each step. Participants are listed and the table after, but fully described along this page.
    sequenceDiagram
        PlayerInput->>ComboAbility: input received
        activate ComboAbility
            ComboAbility->>ComboManager: start combo
            activate ComboManager
                ComboManager->>ComboSetupData: get FSM
                ComboManager-->>ComboAbility: combo FSM
            deactivate ComboManager
            loop In Combo
                ComboAbility->>ComboManager: in combo window?
                ComboManager-->>ComboAbility: yes
                ComboAbility->>ComboManager: advance combo
                activate ComboManager
                    ComboManager->>ComboManager: increment combo
                    ComboManager->>ComboFSM: trigger transition event
                    activate ComboFSM
                        ComboFSM->CombatAbility: activate
                        activate CombatAbility
                            CombatAbility->>CombatAbility: do stuff
                            CombatAbility-->>ComboFSM: finish state
                        deactivate CombatAbility
                    deactivate ComboFSM
                deactivate ComboManager
            end
            activate ComboFSM
                ComboFSM-->>ComboManager: finish execution
            deactivate ComboFSM
            activate ComboManager
                ComboManager-->>ComboAbility: end ability
            deactivate ComboManager
deactivate ComboAbility| Object | Description |
|---|---|
| Combo Ability | Handles input events and forward them to the Combo Component. |
| Combo Component | Stores the Combo Counter and Window state. Sends events to the Combo FSM. |
| Combo Setup Data | A Data Asset storing one combo State Machine and maps Inputs to Event Tags. |
| Combo State Machine | The State Machine configuring how and when each ability can be triggered. |
| Combo Window Notify | Anim Notify State that determines when a combo window is open or closed. |
Enabling the Combo System
If you want to enable the Combo System for a character, first you must assign the NinjaCombatComboComponent
to this character. You can do that via Blueprints or C++ as usual.
Additional Steps for C++ Setup
If you are using C++, make sure to follow the steps to enable C++, listed in the "Initial Setup" page!
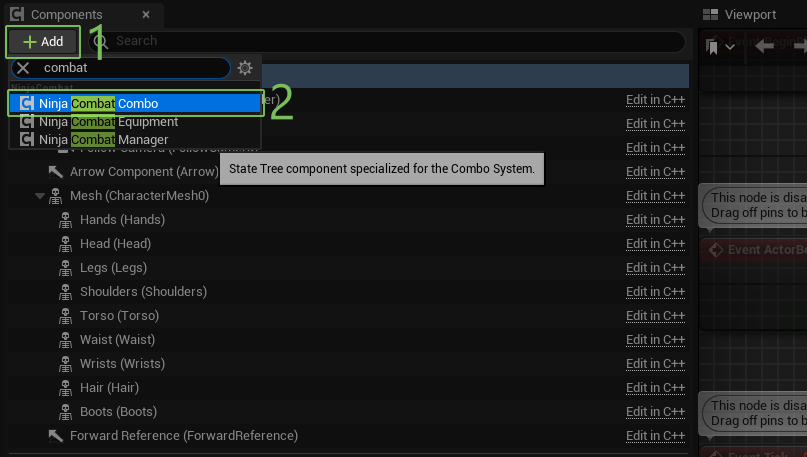
// ----------
// .h
UCLASS()
class NINJATEMPLATE_API ANinjaPlayerCharacter : public ACharacter
{

    GENERATED_BODY()

public:

    ANinjaPlayerCharacter();

private:

    UPROPERTY(EditDefaultsOnly, BlueprintReadOnly, Category = "Components", meta = (AllowPrivateAccess))
    TObjectPtr<UNinjaCombatComboComponent> ComboComponent;

};
// ----------
// .cpp
#include "Components/NinjaCombatComboComponent.h"

ANinjaPlayerCharacter::ANinjaPlayerCharacter()
{
    ComboComponent = CreateDefaultSubobject<UNinjaCombatComboComponent>(TEXT("ComboComponent"));
}
It may be also a good idea to implement the proper method from the CombatComponentProviderInterface. Even
though the Support Library will be able to find this component without the interface, implementing it will
make this process much faster.
First make sure your character implements the interface above, which it should, as recommended during the initial setup. Then, you can implement the appropriate function, either in Blueprint or C++.
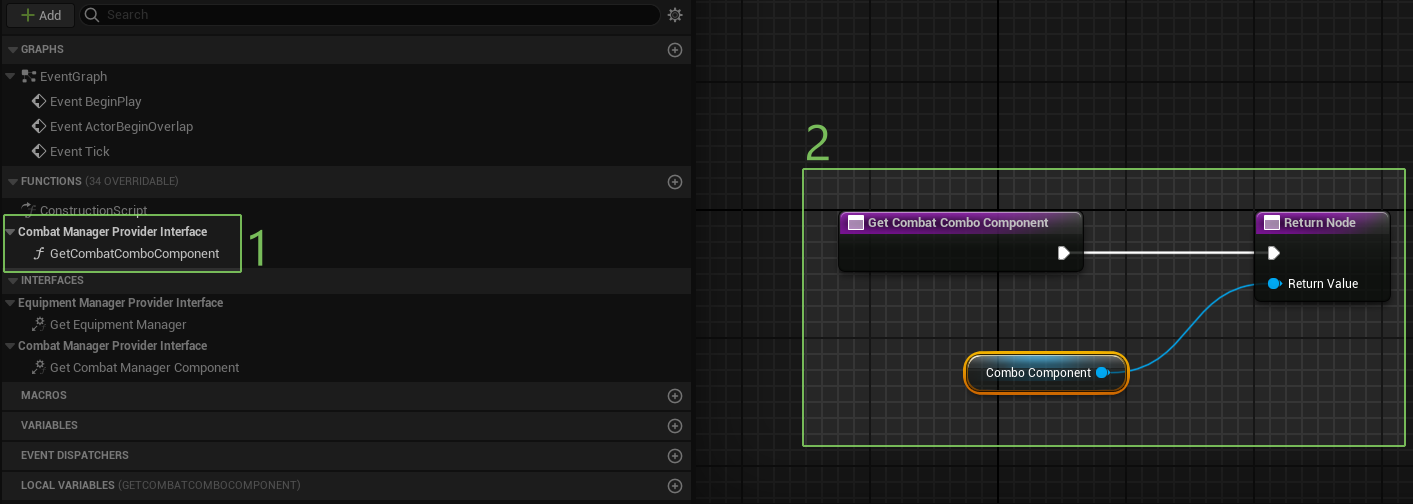
// ----------
// .h
UCLASS()
class NINJATEMPLATE_API ANinjaPlayerCharacter : public ACharacter, public ICombatManagerProviderInterface
{

    GENERATED_BODY()

public:

    ANinjaPlayerCharacter();

    virtual UNinjaCombatComboComponent* GetCombatComboComponent_Implementation() const override;

private:

    UPROPERTY(EditDefaultsOnly, BlueprintReadOnly, Category = "Components", meta = (AllowPrivateAccess))
    TObjectPtr<UNinjaCombatComboComponent> ComboComponent;

};
// ----------
// .cpp
#include "Components/NinjaCombatComboComponent.h"

ANinjaPlayerCharacter::ANinjaPlayerCharacter()
{
    ComboComponent = CreateDefaultSubobject<UNinjaCombatComboComponent>(TEXT("ComboComponent"));
}

UNinjaCombatComboComponent* ANinjaPlayerCharacter::GetCombatComboComponent_Implementation() const
{
    return ComboComponent;
}
Preparing Animation Montages
Pre-requisite: Animation Bluprint and Slot Setup
This step assumes that your project already has a working Animation Blueprint, assigned to your character, with a proper setup for Slots.
Let's prepare the Animation Montages that will be used in your combo. In our example, we'll use five animation montages for all attacks that can be triggered. Therefore we'll need to configure them to have proper Combo Windows and, depending on your animations, adequate Montage Sections.
The Combo Window is an Animation Notify State, used to determine when the Combo Window Starts and ends. During this period, the Combo System will listen for inputs, via Gameplay Events, and react to them.
Let's add a Combo Window to the first Animation Montage, which represents the first attack in the combo. It's a good rule of thumb to add this Notify State when the bulk of your attack has finished, but your recovery pose hasn't started yet. Obviously, each project has a different feel, so adjust as you need.
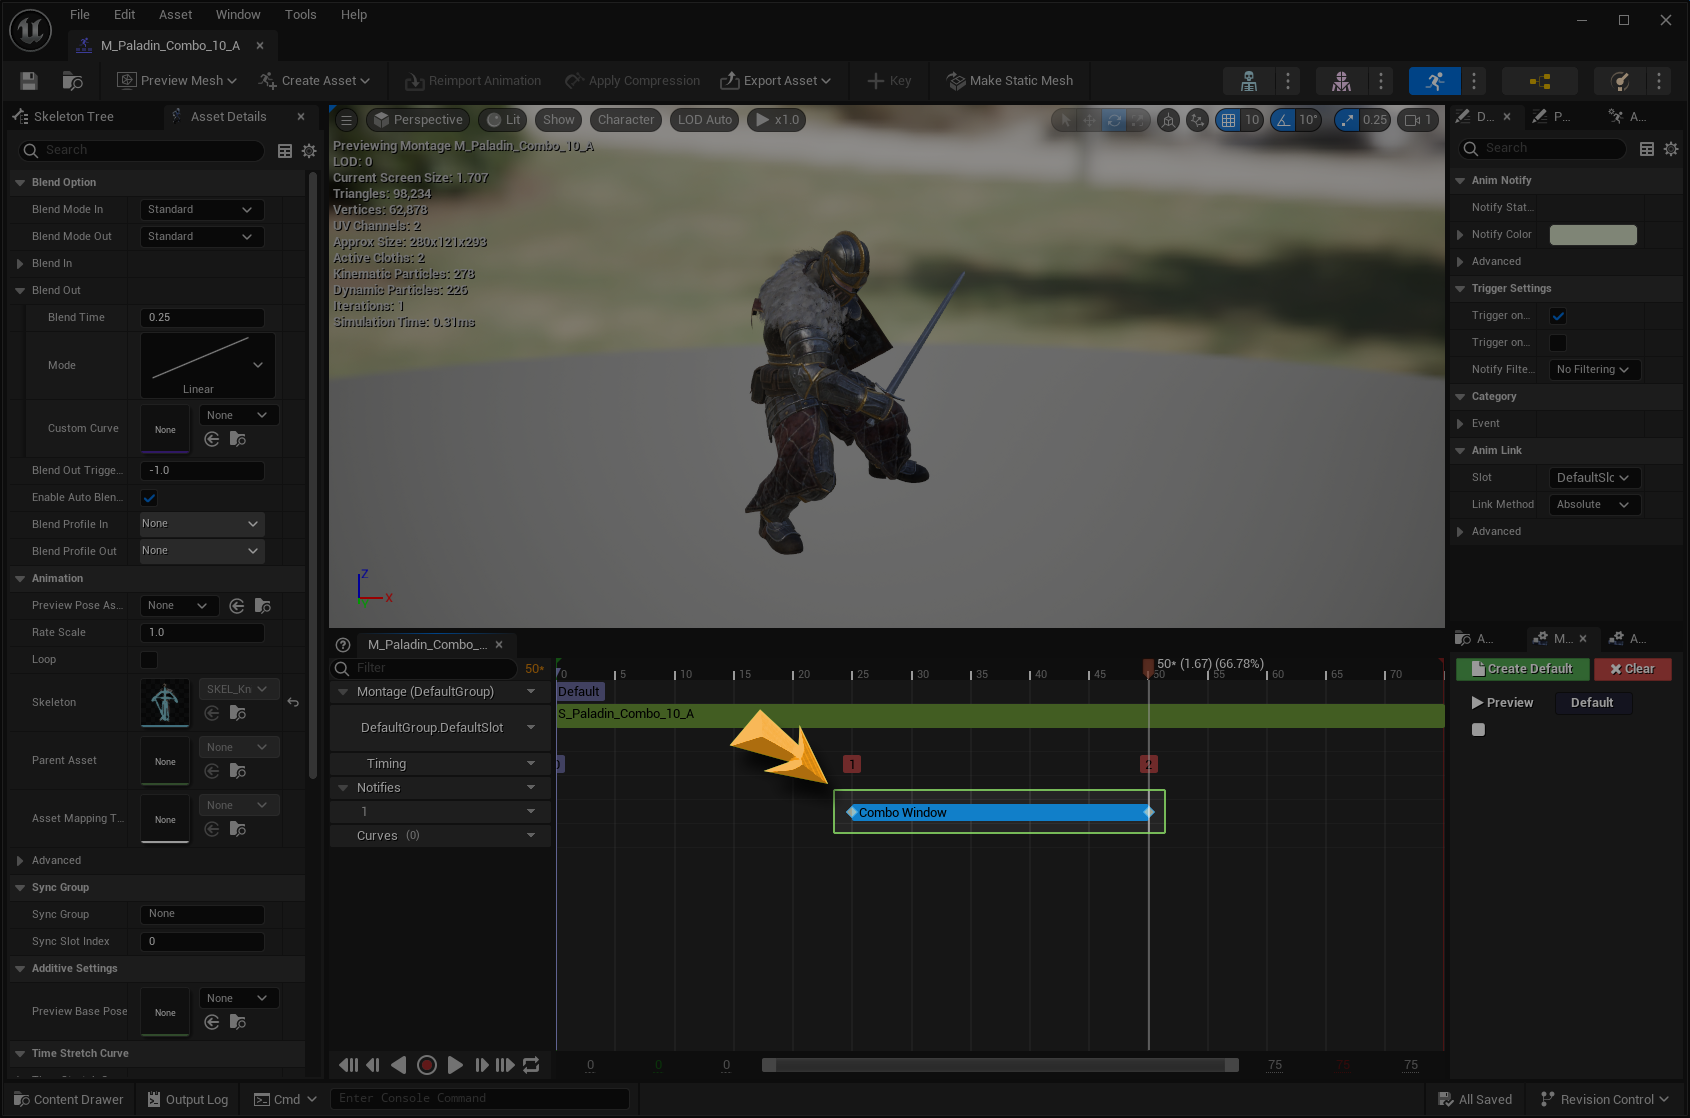
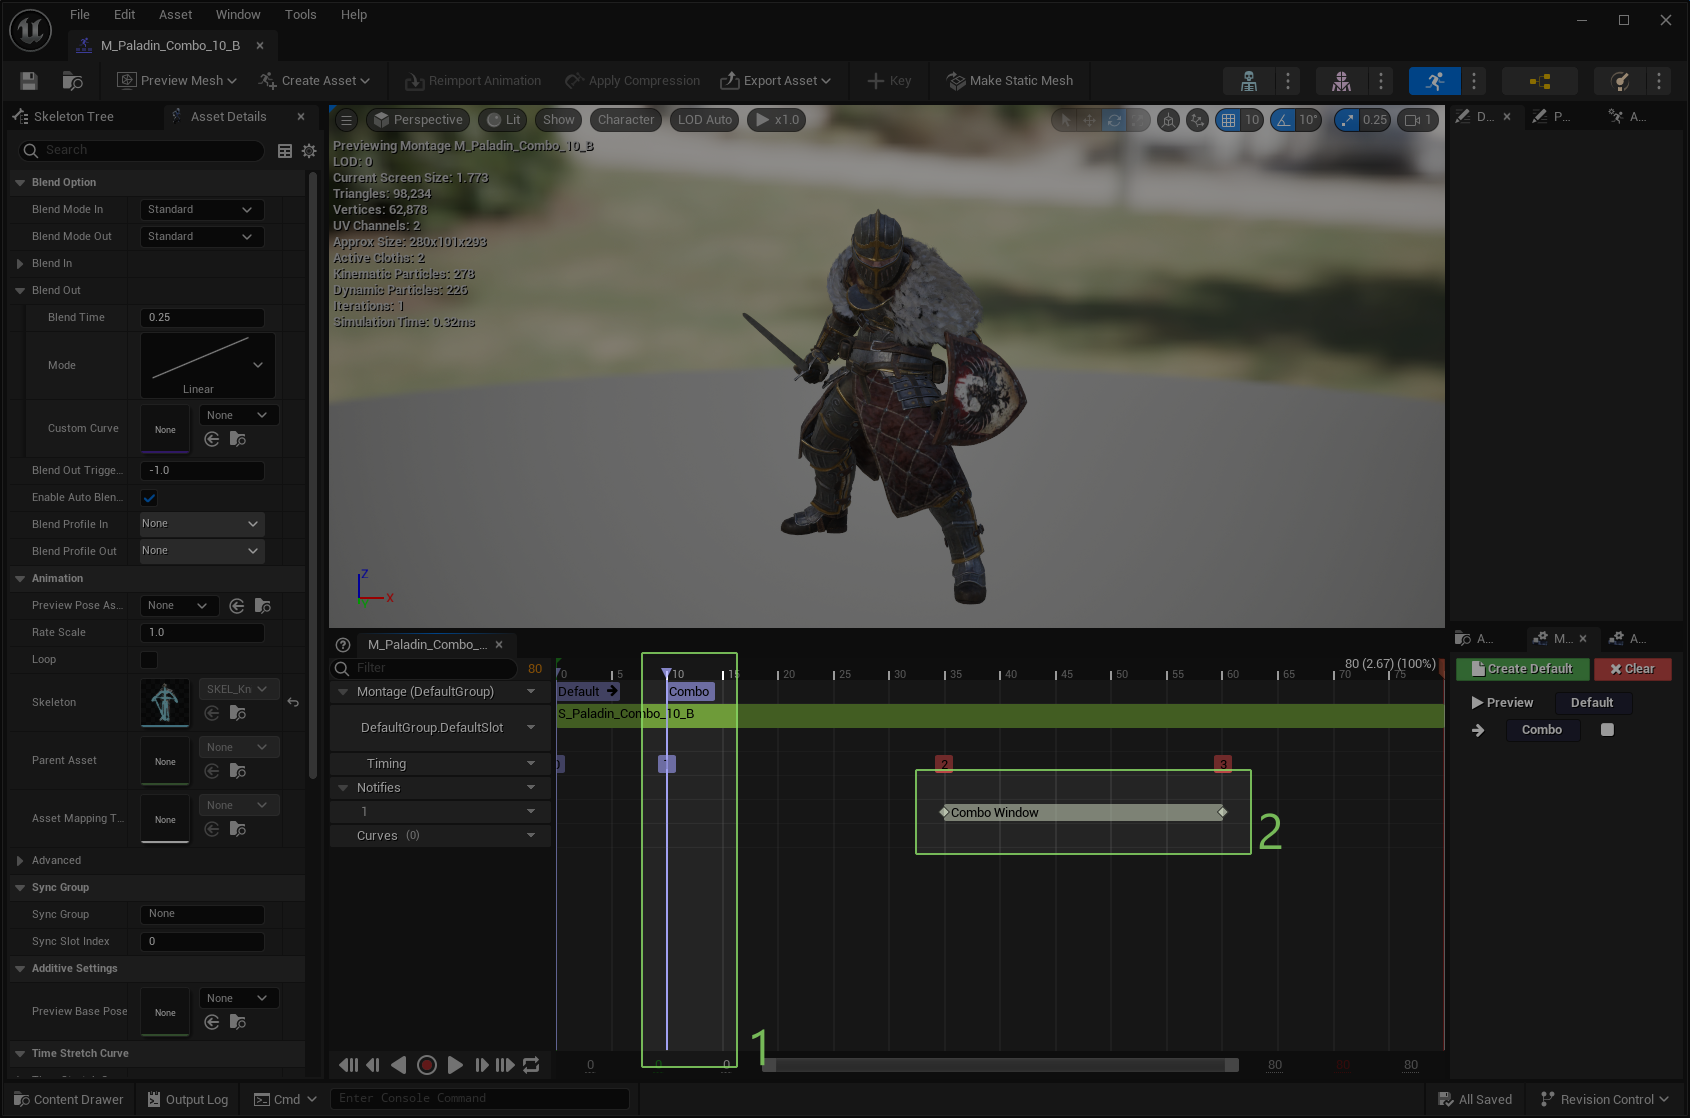
Next, we'll do the same for Animation Montages 2 and 3. We'll skip animations 4 and 5 because our combo is not looping, but if you want to have a looping combo, then make sure to add the Combo Window to your final animations as well.
Also, for the follow up animations, you may want to create a specific Section, that actually marks when the movement should start, if it's being triggered from the previous combo. The image below illustrates this (1) and also contains the Combo Window (2), as expected.
One more note on Animation Sections
To make this very clear, you don't have to create Animation Sections. Depending on your Animation Packs or how you author your assets, they can be perfectly in sequence. however, if each attack has a build-up, then you may want to skip those and go directly into the attack section.
Another option is to have all your Sequences in the same Animation Montage and use the appropriate sections in the combo ability configuration. Once again, the system is made to be flexible in how it's used, without forcing your design or workflow.
Preparing Inputs
Pre-requisite: Input System routed to the Gameplay Ability System
This step assumas that your project already has a working Input System Routing, capable of triggering Gameplay Abilities and Sending Gameplay Events. If you don't, please consider checking the Ninja Input plugin, as it provides this required functionality for you, out-of-the-box!
For this system, there are two types of Input Actions required: One that will trigger the intial Combo Ability
automatically starting the first attack in the chain, and another type of input that will generate Gameplay
Events of type Combat.Event.Combo.Attack, advancing the combo if the combo window is open.
Let's consider two inputs for this example:
-
Light Attack: An Input Action that will trigger a Light Attack. Usually mapped to the Left Mouse button or similar. This Action must trigger the Combo Ability. If the Ability is already active, then send the combo Gameplay Event
Combat.Event.Combo.Attack, including the Input Action asset as the firstOptionalObjectin the event's payload. -
Heavy Attack: An Input Action that will trigger a Heavy Attack. Usually mapped to the Right Mouse button or similar. Like before, this action must trigger the combo Gameplay Event
Combat.Event.Combo.Attackand include the Input Action asset as the firstOptionalObjectin the event's payload.
Covering more inputs in the combo
Any other attacks participating in the combo must be configured in the same way: Trigger the Combo Event that will be handled by the active Combo Ability and the input that has triggered this event in the payload.
Integration with the Ninja Input plugin
Once again, this combo system (and combat plugin) can work really well with the Ninja Input plugin and if you have it enabled in your project, here's how to use it with the Combo System.
Creating a Combo State Tree
Let's now define our combo flow. As mentioned before, this combo will have four steps, but to make things a little more interesting, players will have to decide, after the second attack, if they will trigger the finisher A or Finisher B, depending on their input (i.e. Left or Right mouse buttons).
Here's a flowchart to demonstrate this combo:
    flowchart LR
       A[Ability 1] -->|LMB| B[Ability 2]
       B --> C{Input Branch}
       C -->|LMB| D[Finisher A]
       C -->|RMB| E[Finisher B]
Define flowcharts for your combos
It's highly recommended that you design your combos in a similar fashion, drawing their behavior before creating the actual state machines defining them in the engine!
The Combo State Machine is creating using the Unreal Engine's State Tree module, so some familiarity with it should help.
Combo Schema
When creating your combo, make sure to set the appropriate "Combat Combo" schema.
Let's translate that combo to a State Tree then. First, create a new State Tree asset and add the Combo State Evaluator to the list of Evaluators. Connect the Input Actor to the Actor in the Tree's context.
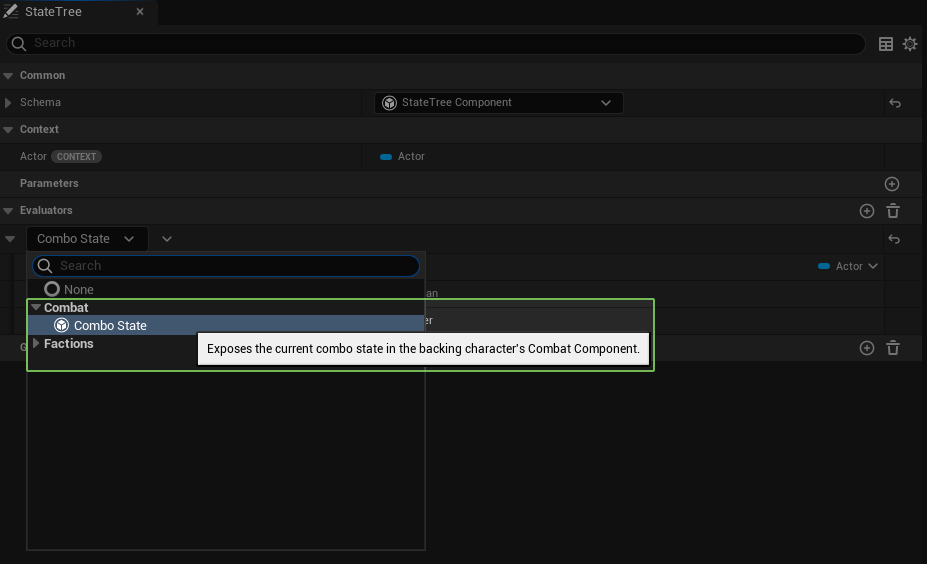
The Combo Evaluator will expose the following data to any other elements in the State Tree:
| Parameter | In/Out | Description |
|---|---|---|
| Combat Actor | In | The Actor executing the combo. It must be bound to the Context Actor. |
| In Combo Window | Out | Informs if the actor is in the Combo Window. |
| Combo Count | Out | Informs the current combo count, starting at zero. |
Now let's create the states for our combo. Since our draft has four abilities being executed, is to be expected that our State Tree will have at least states as well.
Group States
In our case we will add Group States as well, so we can keep the tree organized. Group States are configured
by selecting the value Group for the Type property, in a Tree State. Our groups are "Primary Attacks"
and "Finishers".
Let's break down our first attack. This attack can only go to the secondary attack, so either the State Tree will succeed (no further input provided) or it will move to the next attack.
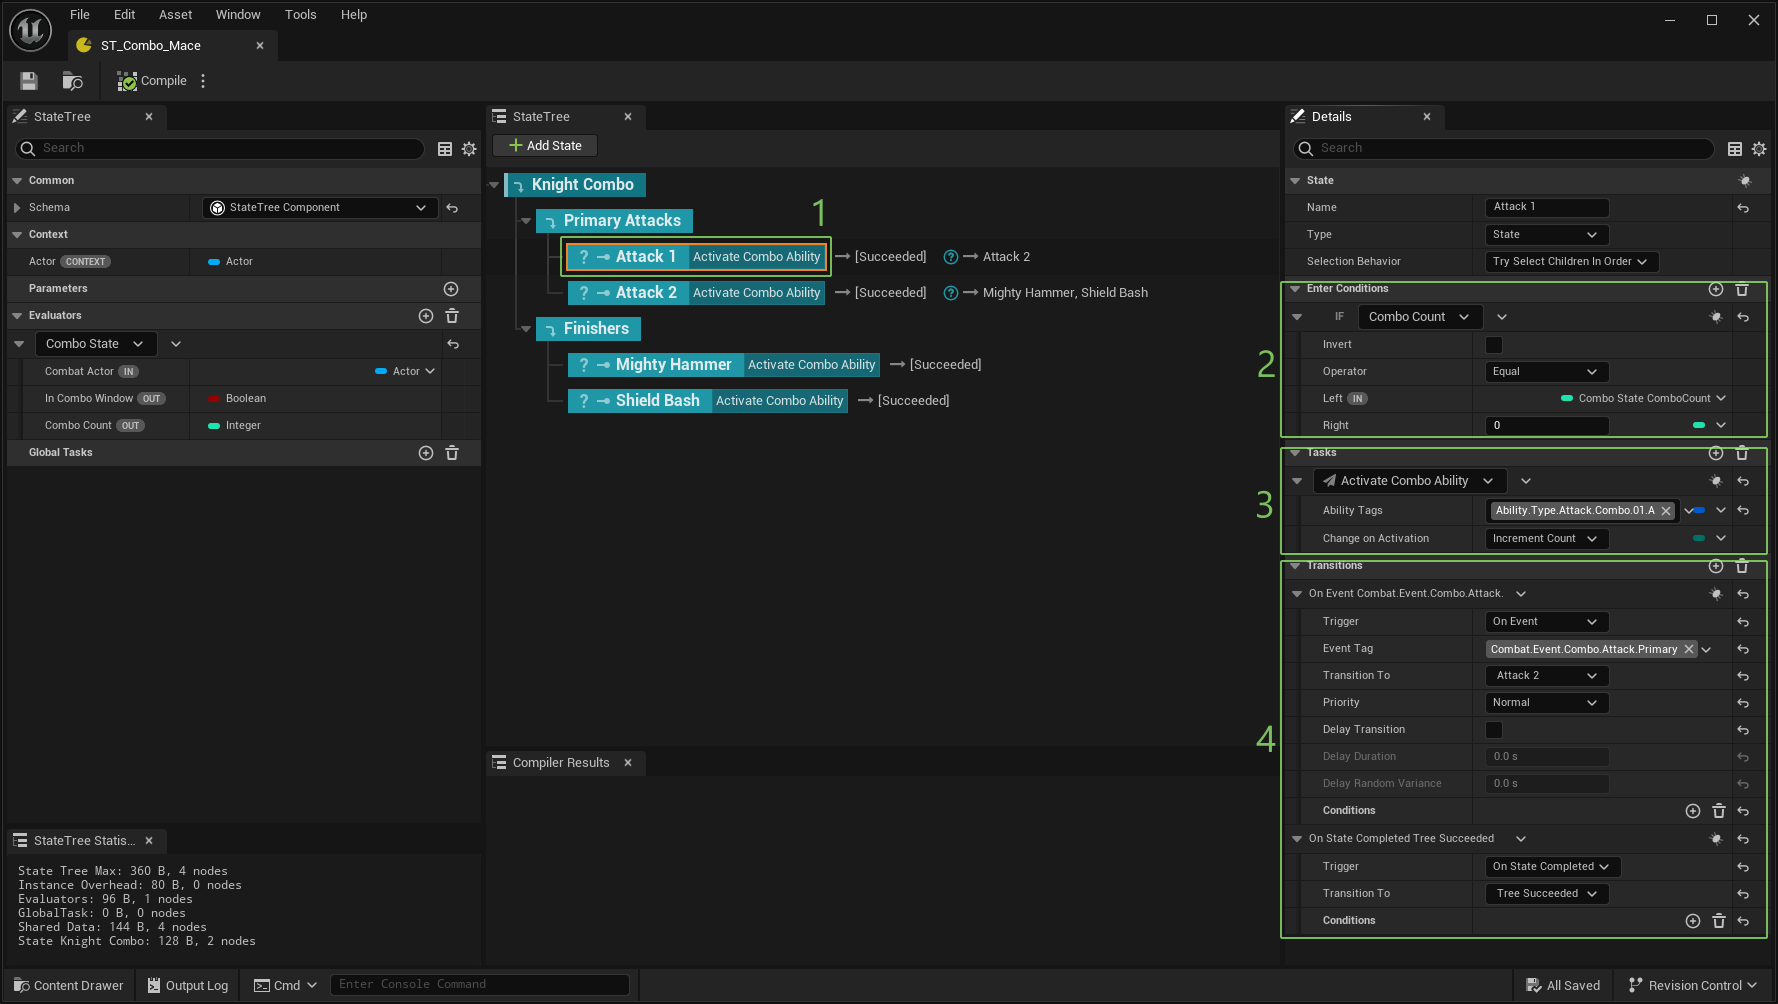
There are a few things going on here, so let's break down each step.
- This is the Combo State. It represents our first ability in the combo.
- The
Combo Count Conditionchecks if this state can be used. The Left operator is bound to the Combo Count variable, exposed by the Combo State Evaluator. This ensures that this state can only be picked-up if the combo is at a certain count, in this case, zero (first attack). - The
Activate Combo Abilitytries to activate an ability by Gameplay Tags and upon activation, performs the change configured. We'll discuss this options right next. - The transitions possible from this state. In this case, we have two: On Combo Event, defined by a Gameplay Tag, we will transition this state to this next attack (Attack 2). Then, On State Completed defines that if this state completes, the entire Combo Tree succeeds (and therefore, the Combo Ability).
Here are the possible changes on activation and why would you use them:
| Change | Description |
|---|---|
NoChange |
The count won't be changed. Something else will have to do it, like a successful hit detection. |
IncrementCount |
Increments the count, moving the Combo to the next state, ready for the next input. |
ResetCount |
Resets the count, allowing the combo to loop from the start. |
And now let's discuss the transitions. Usually, states would at least transition to a successful state, which will make the Combo Tree to finish successfuly, and therefore the Combo Ability will end too.
But most importantly, you can also track events. These are triggered by other inputs, configured in the next section (the Data Asset). We will map certain inputs to the appropriate combo Event Tag set in the Event Transition.
Let's move on to the next state, where a branching may occur.
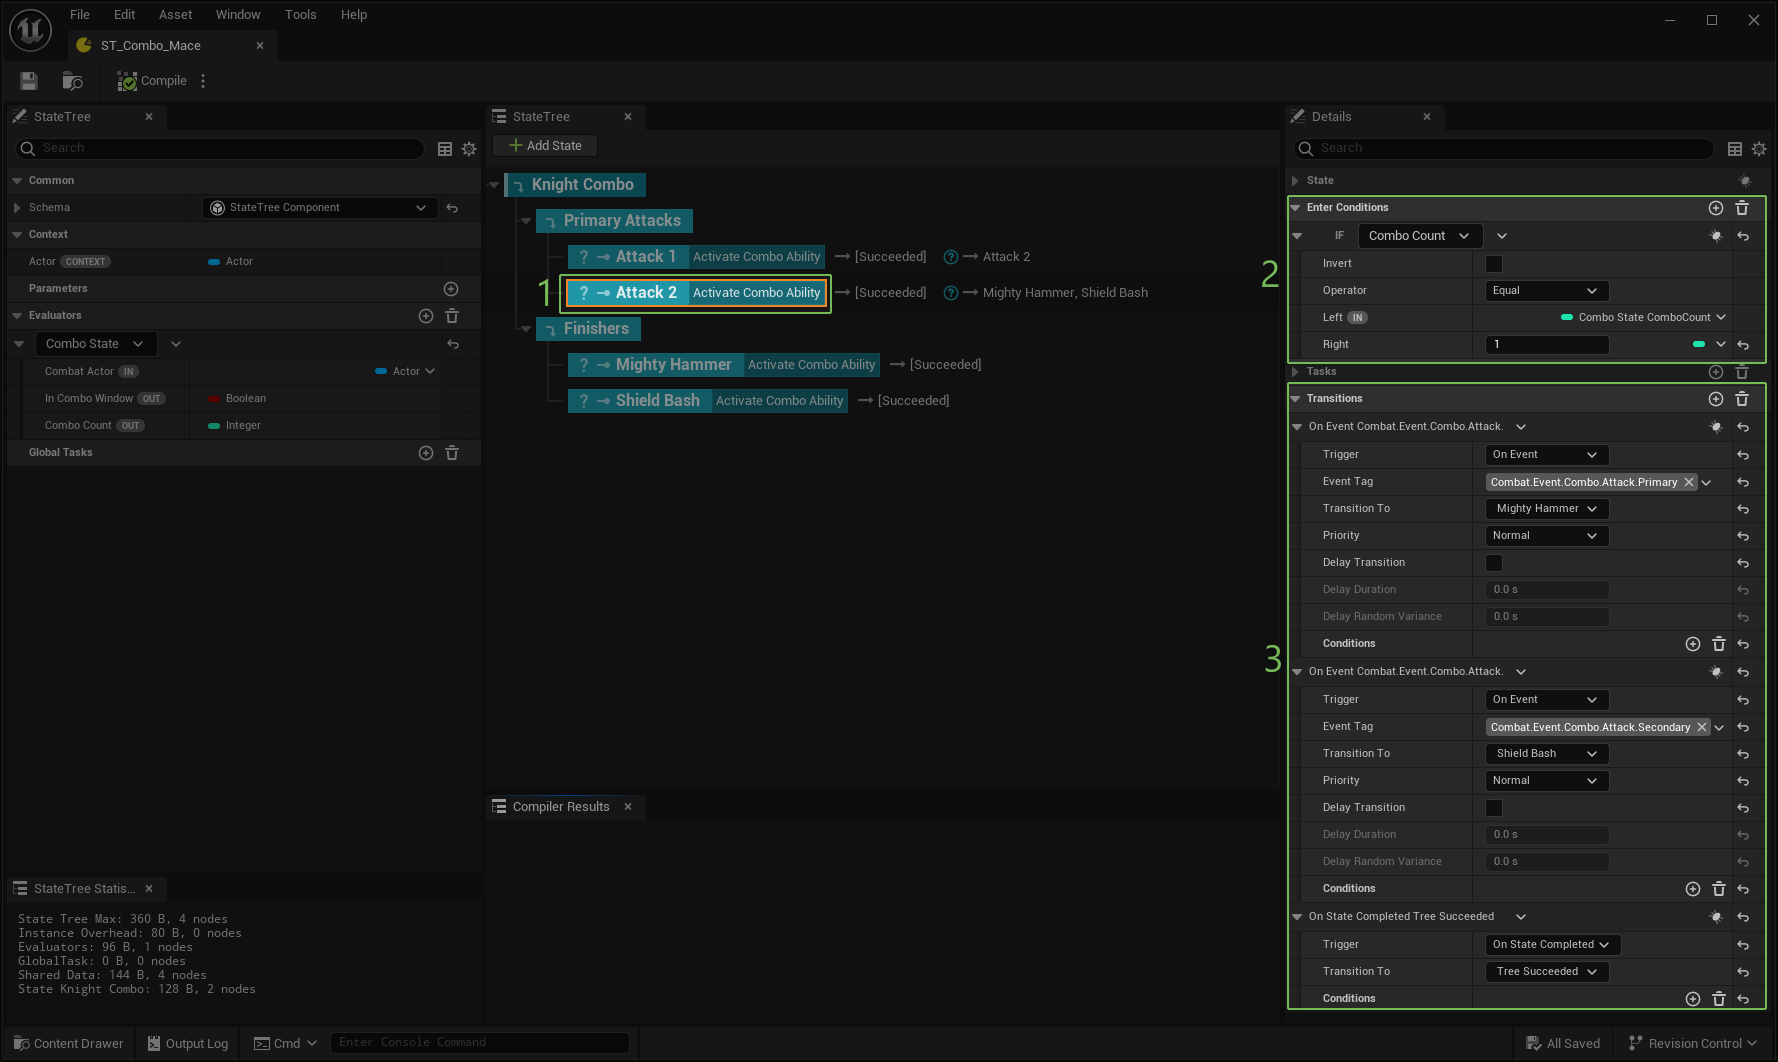
- The Combo State for the second ability in the combo.
- The
Combo Count Conditionnow checks if the Combo Count is set to one, which is the pre-requisite for this attack. - We have three transitions now. The expected On State Completed leading to the end of the Tree, and two transitions of type On Combo Event: the first for the Primary Attack (LMB) and the second for the Secondary Attack (RMB).
Branching States
You can branch to multiple states! Don't forget you can use events and also condititions to select multiple states that could be triggered for the same event. Mixing those two features can generate complex combo graphs!
Now we check the final attacks. They are configured in the same way.
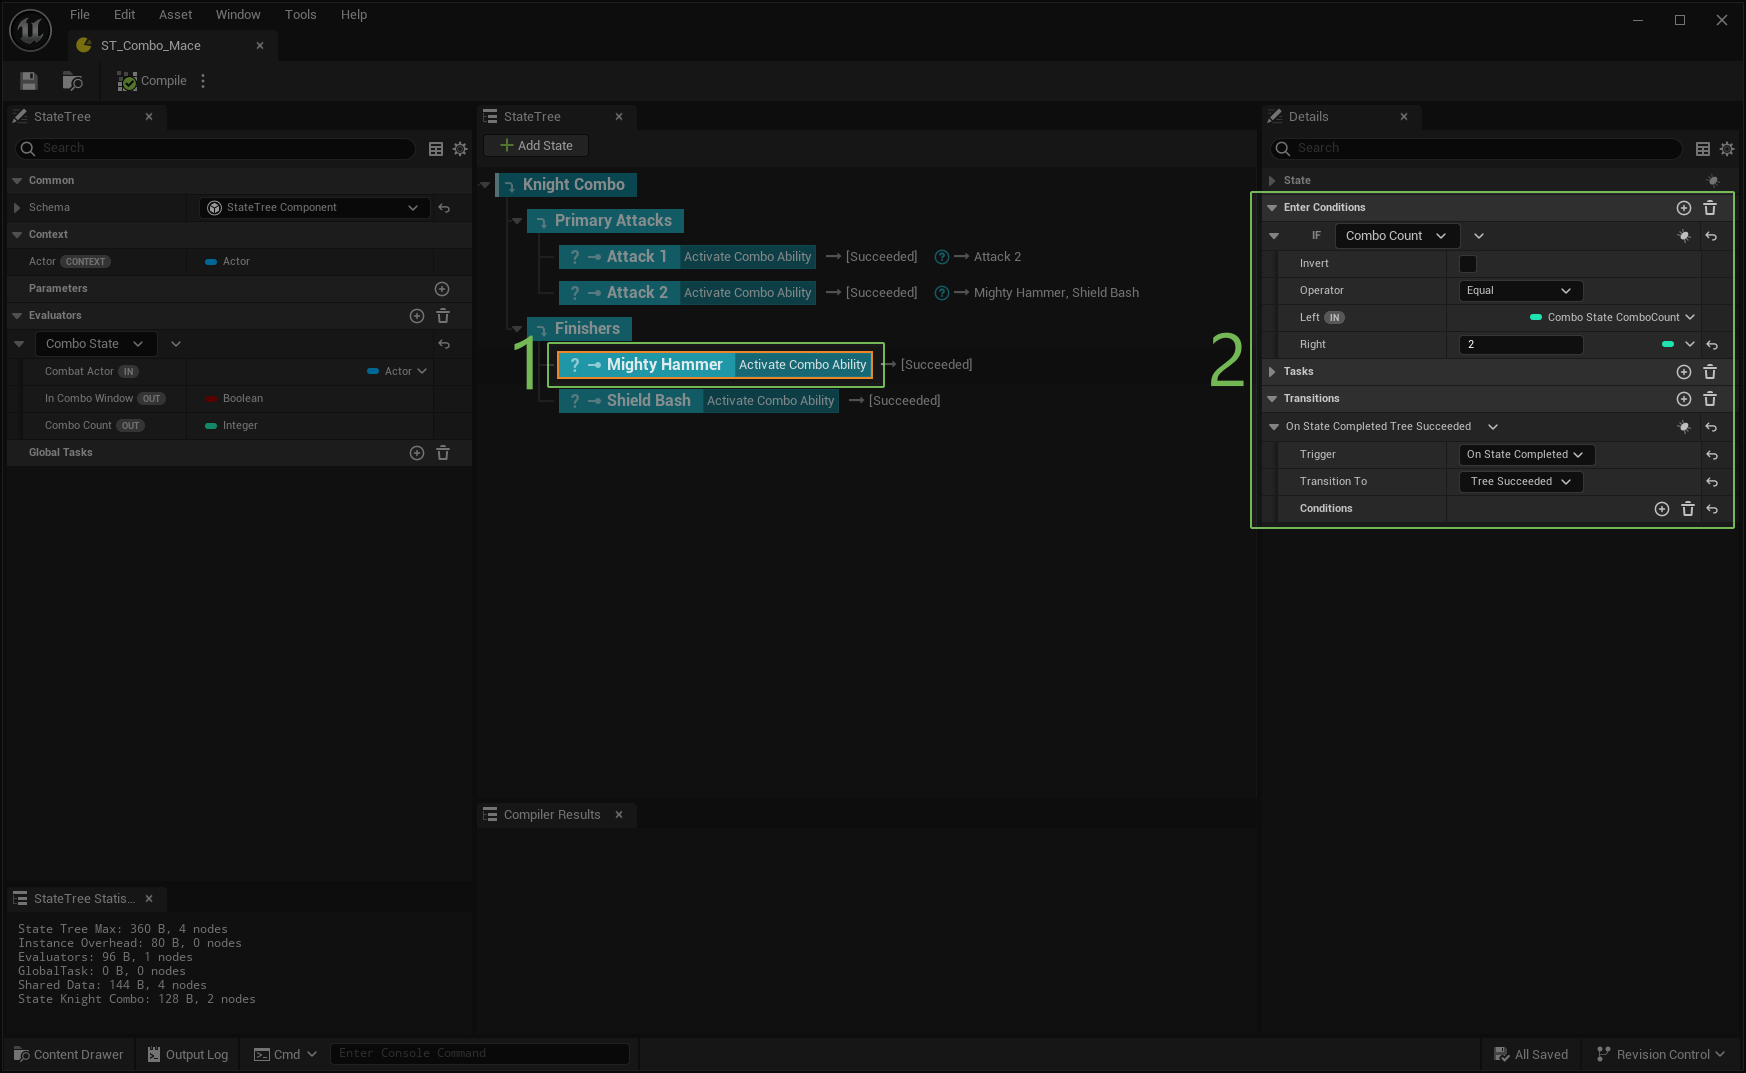
- Once again, the Combo State represents the ability in the combo.
- This is a final state, so we only have the On State Completed Transition. The animation state also don't have a Combo Window.
Looping Combos
If you want your combos to loop, make sure to add a Combo Window in the final Animation, set the appropriate
transition event to the first attack and finally, set the activation change to ResetCount.
Creating the Combo Data Asset
In terms of data, combos are represented by the UNinjaCombatComboData class. It requires the State Tree that
manages the combo states and the mappings of input and events.
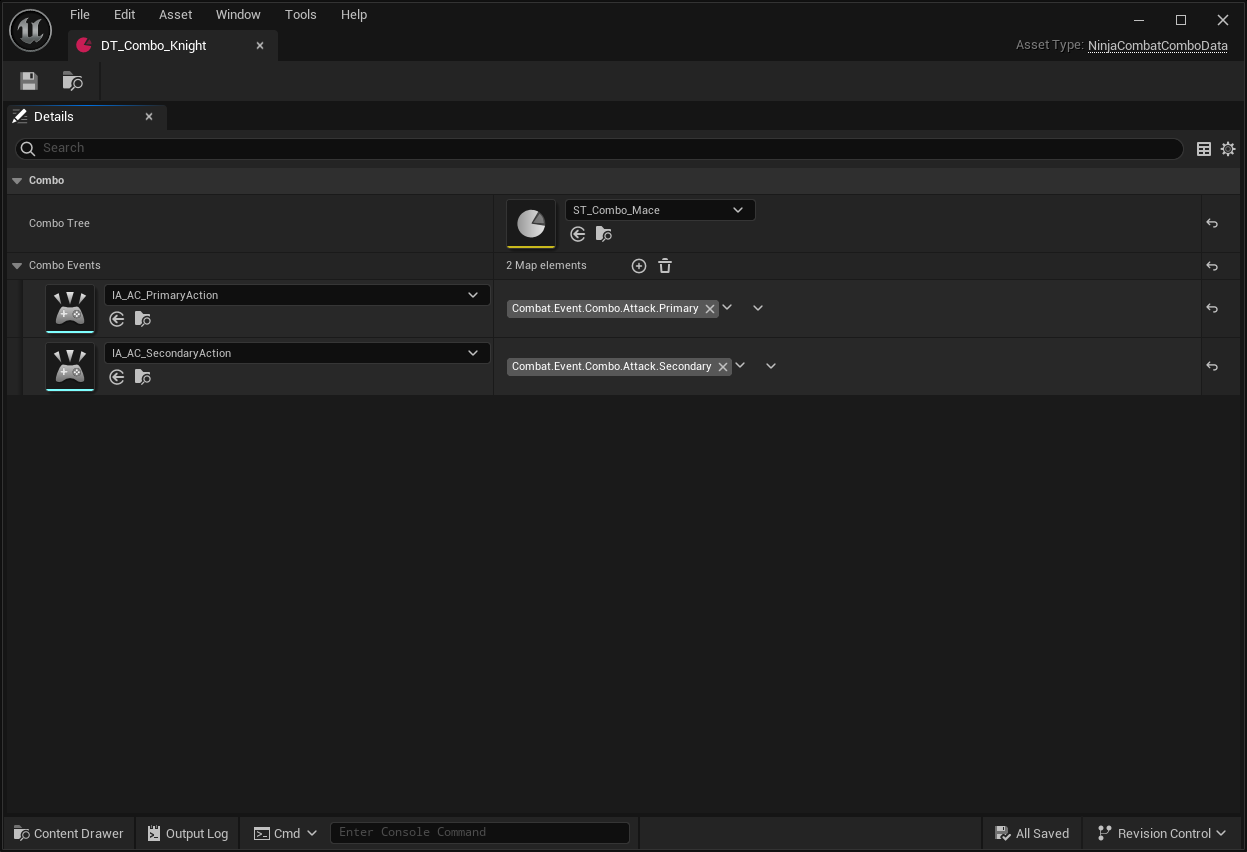
In the example above, you can see the State Tree assigned to the Combat Tree property and then, a Map containing
Input Actions and their respective State Tree Gameplay Tags.
This is an important concept for you to keep in mind, when you are configuring your inputs. The Combo Ability will
be looking for the Input Action in the first OptionalObject of a Gameplay Event. We'll discuss this in more detail
when we talk about the Combo Ability.
The Combo Gameplay Ability
Combos are managed by the UCombatAbility_Combo base class. You need to create a Blueprint Ability based on this
class and assigned the Data Asset that defines the combo.
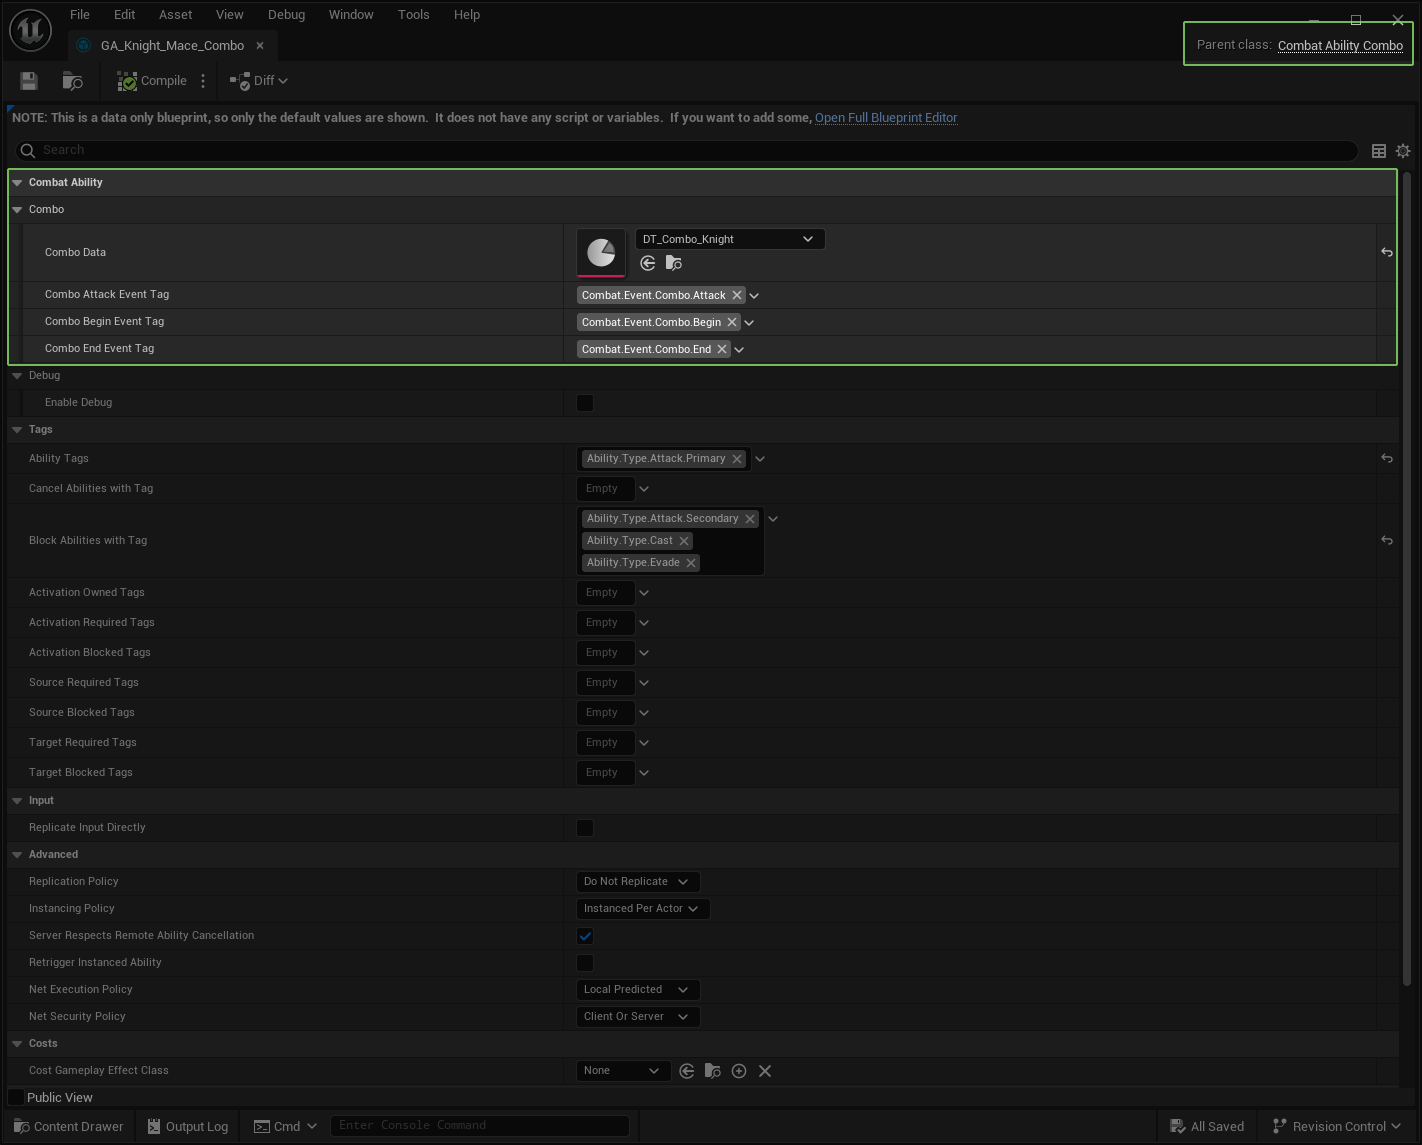
The most important property to define is the Combo Data. In this case it would receive the Data Asset configured
in the previous step.
This ability has specific requirements for the Event Payload that triggers combos. For more information on those, please check the Combo Ability page.
Be mindful of your Activation Tags
If you are activating the combo ability via Gameplay Tags, make sure that the Combo and its Attacks do not
share a common parent. For example, setting the combo tag to ability.attack and each actual attack to ability.attack.01,
ability.attack.02 and so on will confuse the Gameplay Ability System.
The Ability Component supports ability activation by parent tags. Because of that, it's recommended that you
adopt different tag patterns for your combo ability and the actual attacks. For example, you can have the ability.combo
tag for the main combo ability and then ability.attack.01 (and so on) for the actual attacks.
Granting Combo Abilities
Finally, you must assigned all abilities to your character. That means the Combo Ability and any other ability that can be triggered by the combo.
One important note about this design is that all the separate abilities can:
- Check their own costs and cooldowns and apply them as needed.
- Be reused in other scenarios such as AI combat.