Initial Setup
This page will walk you through the pre-requisites and steps needed to enable the Combat Plugin.
Pre-Requisites
Before we get started with setting up the system, there are some pre-requisites that should be in place.
The first one is a working Gameplay Ability System setup, this means all the common steps, such as adding
the AbilitySystemComponent to your pawns or player state. You also must be able to grant new abilities
to your combatants.
Next, you need to make sure that you have proper Input Bindings for the abilities that will be triggered by the Combat System. The way to activate abilities is really up to you, it can be done via Class, Gameplay Tags, etc. Furthermore, if you are planning on using the Combo System, you'll need inputs that will send Gameplay Events.
Input setup
If you don't have your inputs already integrated with the Gameplay Ability System, please consider checking the Ninja Input plugin, as it can handle all input mechanisms for the Gameplay Ability System, plus many others!
Enable the Ninja Combat Plugin
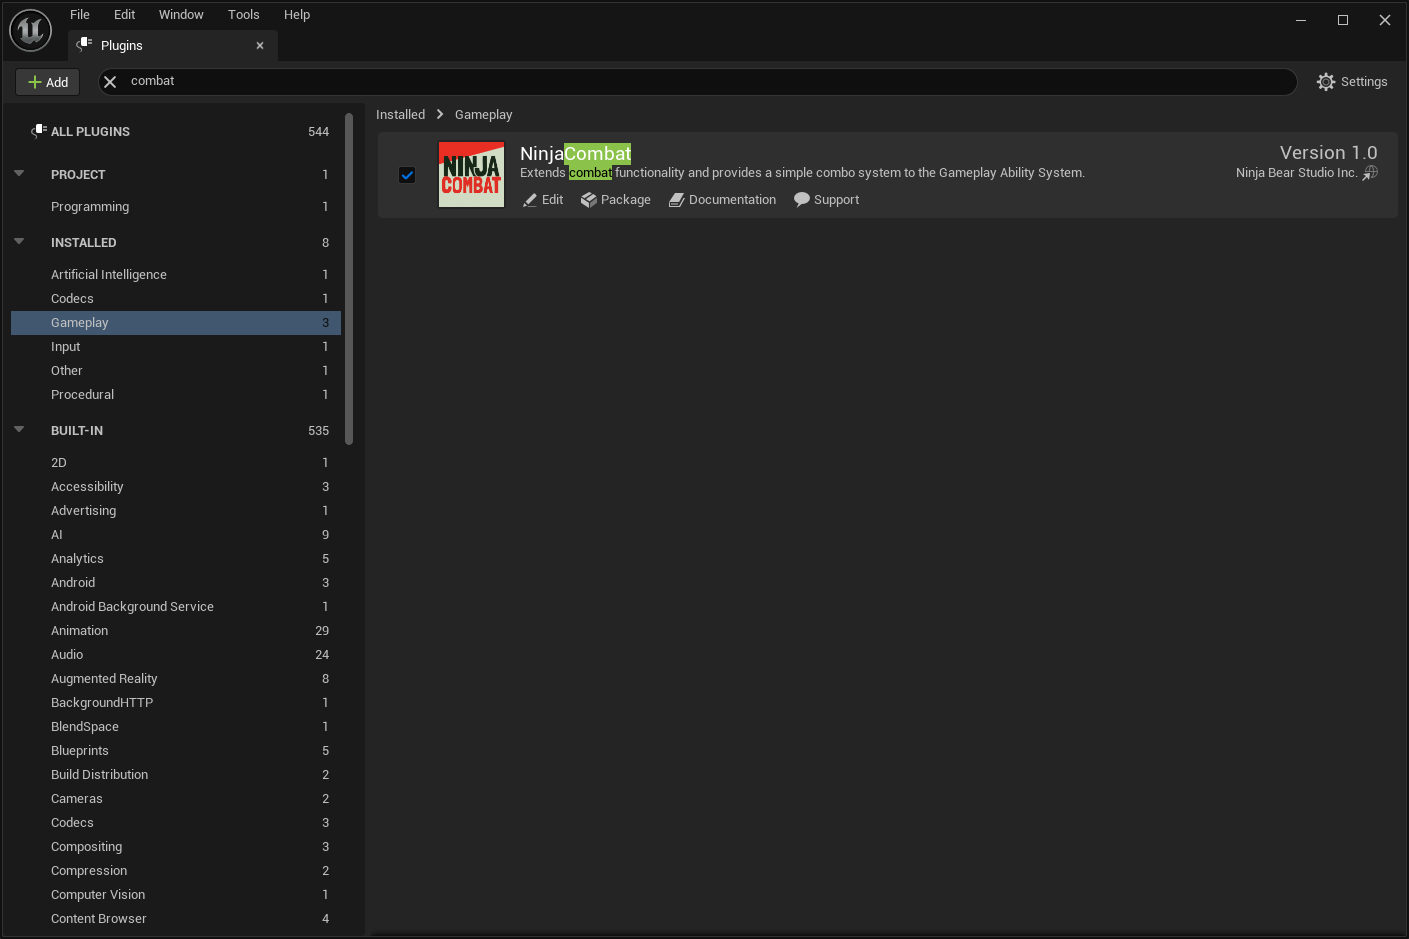
Inside the Editor, go to Edit > Plugins and search for "Ninja Combat". Enable the plugin by ticking the
box and, when prompted, allow the engine to restart.
Configure the Ability System
Now that the Combat Plugin has been enabled, let's perform the initial steps for the Ability System.
Set the Ability System Objects
There are two important Ability System objects that must be included to your project's settings. In this step we'll simply perform the necessary configuration, but you can find more information about them in the dedicated GAS Integration page.
In your DefaultGame.ini file, add the following lines:
[/Script/GameplayAbilities.AbilitySystemGlobals]
AbilitySystemGlobalsClassName="/Script/NinjaCombat.NinjaCombatAbilitySystemGlobals"
GlobalGameplayCueManagerClass="/Script/NinjaCombat.NinjaCombatGameplayCueManager"
You may have these objects already defined
Check if you already have the AbilitySystemGlobals category in your .ini file. You may already have custom values for
these properties. If you have already extended these classes for your project, then please check the GAS Integration page
mentioned above, for options on how you can bring the required functionality into your pre-existing objects.
Add the Attribute Set to your Character
There are a couple different ways to do that, but here are the two most common ways. Both must be done in C++.
- Create a Default Subobject in your Character's Constructor, from the
UNinjaCombatAttributeSetclass. - Create a new instance of the
UNinjaCombatAttributeSet, using theNewObjectfunction and then invoke theAddAttributeSetSubobjectfunction from the Ability System Component, passing the new instance as an argument.
C++ Only
Unfortunately, the Gameplay Ability System does not provide a way to add Attribute Sets to your character using Blueprints. If you are uncomfortable with C++, you can look into an external system, like the GAS Companion!
Grant the Default Abilities
Some Combat Abilities are triggered by Gameplay Events and must be granted as default abilities to your character.
Add the Combat System Components
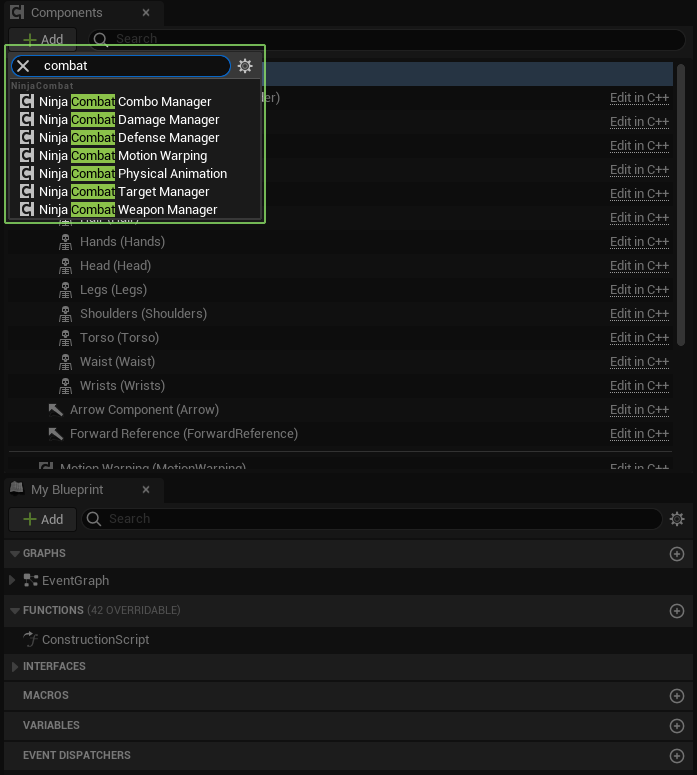
The Combat System provides many components for different parts of its functionality. Some of them are mandatory, others are optional depending on your scope and requirements.
All components are treated by the system as UActorComponents, implementing specific interfaces. This means that
you can provide your own components, fitting your requirements, and they should work without any issues as long as
they adhere to their own interfaces.
Components should be in the Avatar
All combat components are expected to be present in the Ability System's avatar.
More details about each component and their respective interfaces can be found in the System Design page, so please make sure to take a look to better understand these parts of the system. But for now, let's see a summary of them so you can decide early on which ones make sense for your project.
The table below contains the base implementations available from the Component Selector List. As mentioned before they implement interfaces that can be used to create new components. You can also simply extend the current implementations to better suit your needs.
| Component | Description |
|---|---|
ComboManager |
Manages combos. Mostly relevant to Player Characters as AI agents are recommended to follow other approaches, such as an Animation Montage with all attacks. |
DamageManager |
Handles incoming damage, replicating and broadcasting damage info as needed. Integrates with the Defense Manager to mitigate incoming damage. |
DefenseManager |
Handles the defense system such as blocking and invulnerability frames, which are used to mitigate incoming damage. |
MotionWarping |
Allows warping animations, usually to allow Animations with Root Motion to reach/stick to combat targets. Based on the engine's Motion Warping system. |
PhysicalAnimation |
Plays Physical Animations on a skinned mesh. Based on the engine's Physical Animation component and like its base-class it's based on Physical Profiles. |
TargetManager |
Stores a combat target, usually acquired via the Target Lock ability. Replicates and broadcasts new targets to subscribers. |
WeaponManager |
Provides access to weapons that are equipped and ready to be used. Can be used as an integration point with an Inventory System. |
Additional steps for C++ setup
If you plan on working on C++, make sure to add the appropriate dependencies to your Build.cs file.
If you are working with UI-related elements, also add the NinjaCombatUI
// ----------
// .h

class UNinjaCombatComboManagerComponent;
class UNinjaCombatDamageManagerComponent;
class UNinjaCombatDefenseManagerComponent;
class UNinjaCombatMotionWarpingComponent;
class UNinjaCombatPhysicalAnimationComponent;
class UNinjaCombatTargetManagerComponent;
class UNinjaCombatWeaponManagerComponent;

UCLASS()
class NINJATEMPLATE_API ANinjaPlayercharacter : public ACharacter
{

public:

    ANinjaPlayerCharacter();

private:

    UPROPERTY(EditDefaultsOnly, BlueprintReadOnly, Category = "Components", meta = (AllowPrivateAccess = true))
    UArrowComponent* ForwardReference;

    UPROPERTY(EditDefaultsOnly, BlueprintReadOnly, Category = "Components", meta = (AllowPrivateAccess = true))
    TObjectPtr<UNinjaCombatComboManagerComponent> ComboManager;

    UPROPERTY(EditDefaultsOnly, BlueprintReadWrite, Category = "Components", meta = (AllowPrivateAccess = true))
    TObjectPtr<UNinjaCombatDamageManagerComponent> DamageManager;

    UPROPERTY(EditDefaultsOnly, BlueprintReadWrite, Category = "Components", meta = (AllowPrivateAccess = true))
    TObjectPtr<UNinjaCombatDefenseManagerComponent> DefenseManager;

    UPROPERTY(EditDefaultsOnly, BlueprintReadWrite, Category = "Components", meta = (AllowPrivateAccess = true))
    TObjectPtr<UNinjaCombatMotionWarpingComponent> MotionWarping;

    UPROPERTY(EditDefaultsOnly, BlueprintReadWrite, Category = "Components", meta = (AllowPrivateAccess = true))
    TObjectPtr<UNinjaCombatPhysicalAnimationComponent> PhysicalAnimation;

    UPROPERTY(EditDefaultsOnly, BlueprintReadWrite, Category = "Components", meta = (AllowPrivateAccess = true))
    TObjectPtr<UNinjaCombatTargetManagerComponent> TargetManager;

    UPROPERTY(EditDefaultsOnly, BlueprintReadWrite, Category = "Components", meta = (AllowPrivateAccess = true))
    TObjectPtr<UNinjaCombatWeaponManagerComponent> WeaponManager;

};

// ----------
// .cpp

#include "ANinjaPlayerCharacter.h"
#include "Components/NinjaCombatManagerComponent.h"

ANinjaPlayerCharacter::ANinjaPlayerCharacter()
{
    ComboManager = CreateDefaultSubobject<UNinjaCombatComboManagerComponent>(TEXT("ComboManager"));
    DamageManager = CreateDefaultSubobject<UNinjaCombatDamageManagerComponent>(TEXT("DamageManager"));
    DefenseManager = CreateDefaultSubobject<UNinjaCombatDefenseManagerComponent>(TEXT("DefenseManager"));
    MotionWarping = CreateDefaultSubobject<UNinjaCombatMotionWarpingComponent>(TEXT("MotionWarping"));
    PhysicalAnimation = CreateDefaultSubobject<UNinjaCombatPhysicalAnimationComponent>(TEXT("PhysicalAnimation"));
    TargetManager = CreateDefaultSubobject<UNinjaCombatTargetManagerComponent>(TEXT("TargetManager"));
    WeaponManager = CreateDefaultSubobject<UNinjaCombatWeaponManagerComponent>(TEXT("WeaponManager"));
}
public MyGame(ReadOnlyTargetRules target) : base(target)
{
    PCHUsage = PCHUsageMode.UseExplicitOrSharedPCHs;
    PublicDependencyModuleNames.AddRange(new []
    {
        "Core",
        "GameplayAbilities",
        "GameplayTags",
        "GameplayTasks",
        "InputCore",
        "NinjaCombat"
        // ...
    });
}
Implement the Combat Interface
The Combat System Interface is used to provide fast access to the multiple elements from the character, needed by the Combat System, such as the components initialized above.
It's meant to be implemented by all pawns and characters participating in combat, which can be done either in Blueprints or C++.
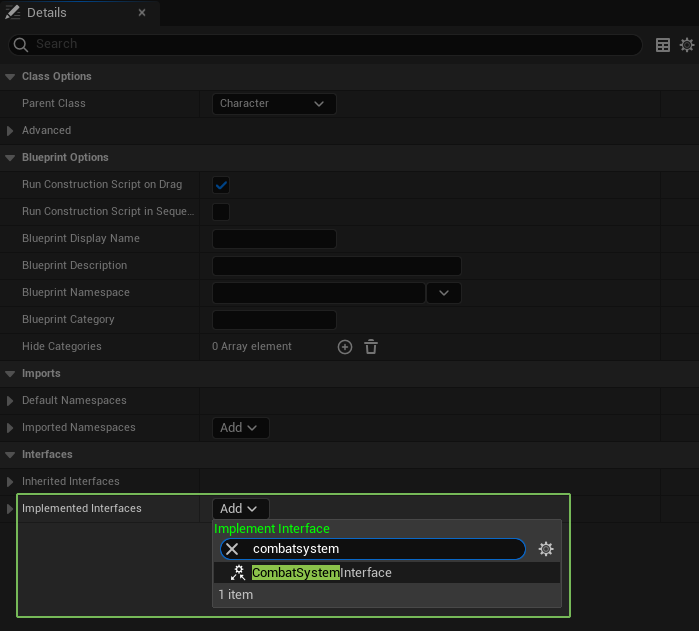
In Blueprints, you can do that by going into Blueprint Class and then navigate to Class Settings > Implemented Interfaces
and selecting the CombatSystemInterface. In C++, you can simply implement ICombatSystemInterface.
// ----------
// .h

#include "Interfaces/CombatSystemInterface.h"

UCLASS()
class NINJATEMPLATE_API ANinjaPlayercharacter : public ACharacter, public ICombatSystemInterface
{

    GENERATED_BODY()

public:

    ANinjaPlayercharacter();

};
Next we need to implement the GetCombatManagerComponent function so it will provide the Combat Component that
was created in the previous step. Once again, we can do that in Blueprints or C++.
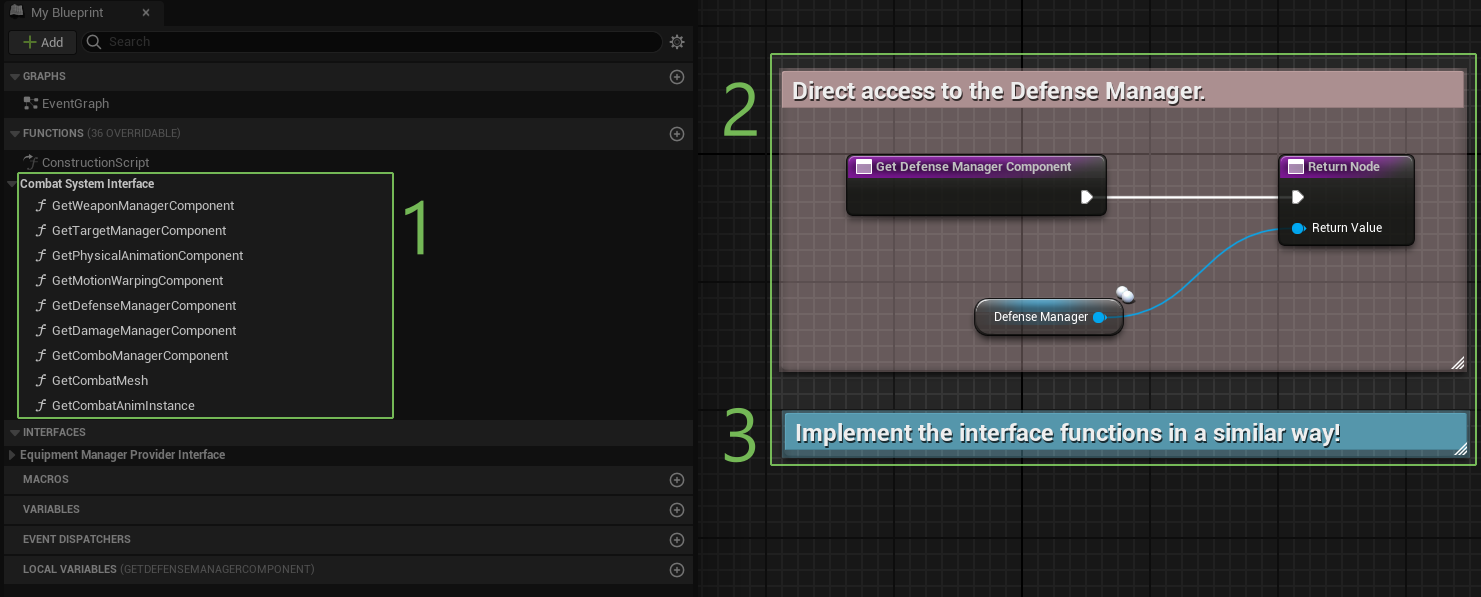
- Double click each Interface Function that you wish to implement.
- Connect the expected component to the function.
- Do that for other components you want to provide.
// ----------
// .h

#include "Interfaces/CombatSystemInterface.h"

UCLASS()
class NINJATEMPLATE_API ANinjaPlayercharacter : public ACharacter, public ICombatSystemInterface
{

    GENERATED_BODY()

public:

    ANinjaPlayercharacter();

    // -- Begin Combat System implementation
    virtual USkeletalMeshComponent* GetCombatMesh_Implementation() const override;
    virtual UArrowComponent* GetCombatForwardReference_Implementation() const override;
    virtual UActorComponent* GetComboManagerComponent_Implementation() const override;
    virtual UActorComponent* GetDamageManagerComponent_Implementation() const override;
    virtual UActorComponent* GetDefenseManagerComponent_Implementation() const override;
    virtual UActorComponent* GetMotionWarpingComponent_Implementation() const override;
    virtual UActorComponent* GetPhysicalAnimationComponent_Implementation() const override;
    virtual UActorComponent* GetTargetManagerComponent_Implementation() const override;
    virtual UActorComponent* GetWeaponManagerComponent_Implementation() const override;
    // -- End Combat System implementation

};

// ----------
// .cpp

#include "ANinjaPlayerCharacter.h"

#include "Components/NinjaCombatComboManagerComponent.h"
#include "Components/NinjaCombatDamageManagerComponent.h"
#include "Components/NinjaCombatDefenseManagerComponent.h"
#include "Components/NinjaCombatMotionWarpingComponent.h"
#include "Components/NinjaCombatPhysicalAnimationComponent.h"
#include "Components/NinjaCombatTargetManagerComponent.h"
#include "Components/NinjaCombatWeaponManagerComponent.h"

ANinjaPlayerCharacter::ANinjaPlayerCharacter()
{
    // ...

    ComboManager = CreateDefaultSubobject<UNinjaCombatComboManagerComponent>(TEXT("ComboManager"));
    DamageManager = CreateDefaultSubobject<UNinjaCombatDamageManagerComponent>(TEXT("DamageManager"));
    DefenseManager = CreateDefaultSubobject<UNinjaCombatDefenseManagerComponent>(TEXT("DefenseManager"));
    MotionWarping = CreateDefaultSubobject<UNinjaCombatMotionWarpingComponent>(TEXT("MotionWarping"));
    PhysicalAnimation = CreateDefaultSubobject<UNinjaCombatPhysicalAnimationComponent>(TEXT("PhysicalAnimation"));
    TargetManager = CreateDefaultSubobject<UNinjaCombatTargetManagerComponent>(TEXT("TargetManager"));
    WeaponManager = CreateDefaultSubobject<UNinjaCombatWeaponManagerComponent>(TEXT("WeaponManager"));

    ForwardReference = CreateDefaultSubobject<UArrowComponent>(TEXT("ForwardReference"));
    ForwardReference->ComponentTags.Add(Tag_Combat_Component_ForwardReference.GetTag().GetTagName());
    ForwardReference->SetVisibleFlag(false);
    ForwardReference->SetUsingAbsoluteRotation(true);
    ForwardReference->SetWorldRotation(FRotator::ZeroRotator);
    ForwardReference->SetArrowColor(FLinearColor::Green);
    ForwardReference->SetAutoActivate(true);
    ForwardReference->SetupAttachment(GetRootComponent());
}

USkeletalMeshComponent* ANinjaPlayerCharacter::GetCombatMesh_Implementation() const { return GetMesh(); }
UArrowComponent* ANinjaPlayerCharacter::GetCombatForwardReference_Implementation() const { return ForwardReference; }
UActorComponent* ANinjaPlayerCharacter::GetComboManagerComponent_Implementation() const { return ComboManager; }
UActorComponent* ANinjaPlayerCharacter::GetDamageManagerComponent_Implementation() const { return DamageManager; }
UActorComponent* ANinjaPlayerCharacter::GetDefenseManagerComponent_Implementation() const { return DefenseManager; }
UActorComponent* ANinjaPlayerCharacter::GetMotionWarpingComponent_Implementation() const { return MotionWarping; }
UActorComponent* ANinjaPlayerCharacter::GetPhysicalAnimationComponent_Implementation() const { return PhysicalAnimation; }
UActorComponent* ANinjaPlayerCharacter::GetTargetManagerComponent_Implementation() const { return TargetManager; }
UActorComponent* ANinjaPlayerCharacter::GetWeaponManagerComponent_Implementation() const { return WeaponManager; }
Get Mesh and Get Anim Instance
The GetCombatMesh function must return the Mesh that is used as a reference for melee scans and projectiles. It may
just be the character mesh, as the example above, or something different in your project. Make sure to set it correctly.
By default, the GetCombatAnimInstance function retrieves the Animation Instance from the provided Mesh, but if you
need something different than that, then make sure to implement that function as well.
Get Combat Forward
The expectation here is to provide an Arrow Component, probably attached to the root component, set to use Absolute Rotation. This arrow is used to retrieved forward references and calculate angles for abilities such as Evades.
If you have the Ninja Input plugin, this is the same Forward Reference that could be required by that system too. You can find more information about its counterpart in the Initial Setup page and also in the Integration Page for both systems.
Base Character and Player Character
Some components may be only necessary for your player character. The Combo Manager is a great example, but maybe for
your usage scenario there are others too. So you may need to implement the ICombatSystemInterface in your Base Character,
potentially return nullptr in the GetComboManagerComponent_Implementation function.
Then, your Player Character, you'll have to override the function once again, to return the proper instance of the component, created in that specific subclass.
This interface is fully implemented
If you investigate the ICombatSystemInterface, you'll realize that all of its methods are already implemented.
However, they are basic implementations, constantly looking for specific components, via Component Finders.
Implementing these methods yourself can provide fast access to these necessary instances and vastly improve you performance. For prototyping, you should be fine with the base implementations.
Create Dedicated Collision Channels
You may want to create dedicated trace channels for Melee Scans and Projectiles. One way of doing that, for example is by
adding the following lines to your DefaultEngine.ini file.
[/Script/Engine.CollisionProfile]
+DefaultChannelResponses=(Channel=ECC_GameTraceChannel1,DefaultResponse=ECR_Ignore,bTraceType=True,bStaticObject=False,Name="Weapon")
+DefaultChannelResponses=(Channel=ECC_GameTraceChannel2,DefaultResponse=ECR_Block,bTraceType=True,bStaticObject=True,Name="Projectile")
+DefaultChannelResponses=(Channel=ECC_GameTraceChannel3,DefaultResponse=ECR_Ignore,bTraceType=True,bStaticObject=True,Name="Opportunity")
!!! tip "Ignore versus Block In the setup above, you'll notice that the melee is set to "ignore" by default. You should consider if you want your melee attacks interacting only with possible targets or with everything in the world (for example, you want to add decals to walls after hitting them with a sword).
If collisions are more specifc, set the default response to ignore, and "opt-in" in components that should react to melee attacks.
If collisions are common, set the default response to block, and "opt-out" in components that should not react to melee attacks.
Double-check your Game Trace Channels
In the example above we are using certain Trace Channels that might be use for other purposes in your game. Make sure to double check that and add the appropriate Trace Channels for your scenario!
Then, assign these Collision Channels in your Combat Settings:
Edit>Project Settings>Ninja Combat
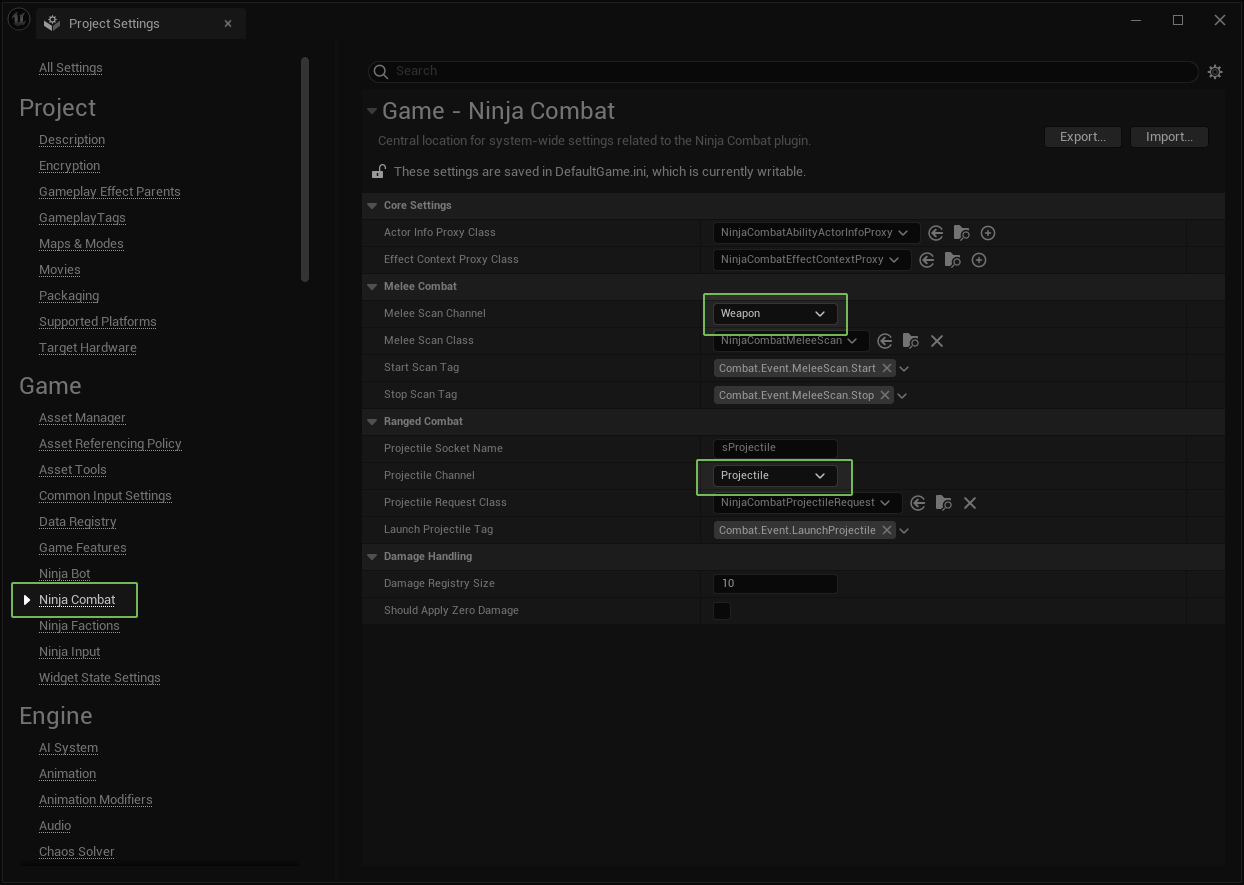
Finally, you need to be mindful of where these collisions are relevant:
- The Weapon and Projectile collisions are relevant to your character's meshes, so it should Block them.
- The Opportunity collision is relevant to your character's capsule, so it should Overlap it.