Initial Setup
This page will walk you through the pre-requisites and steps needed to enable the Input Plugin.
Pre-Requisites
First, we need to clear other inputs from the project, since the Enhanced Input comes enabled by default, and basic inputs are usually handled by the Unreal Engine Templates.
Remove the default Input Action Events from the character's Blueprint Graph and most importantly, remove the assignment
of the Input Mapping Context from your Character. Also make sure that you don't have any default assignments in your
configuration, under Project Setings > Enhanced Input.
Input Mapping Context Duplicates
Duplicates of an Input Mapping Context are discarded by the Input Manager Component. For example, assigning the IMC in your Character and then assigning the same IMC to the component would discard the latter, meaning no input would be handled by the component!
Enable the Ninja Input Plugin
Inside the Editor, go to Edit > Plugins and search for "Ninja Input". Enable the plugin by ticking the
box and, when prompted, allow the engine to restart.
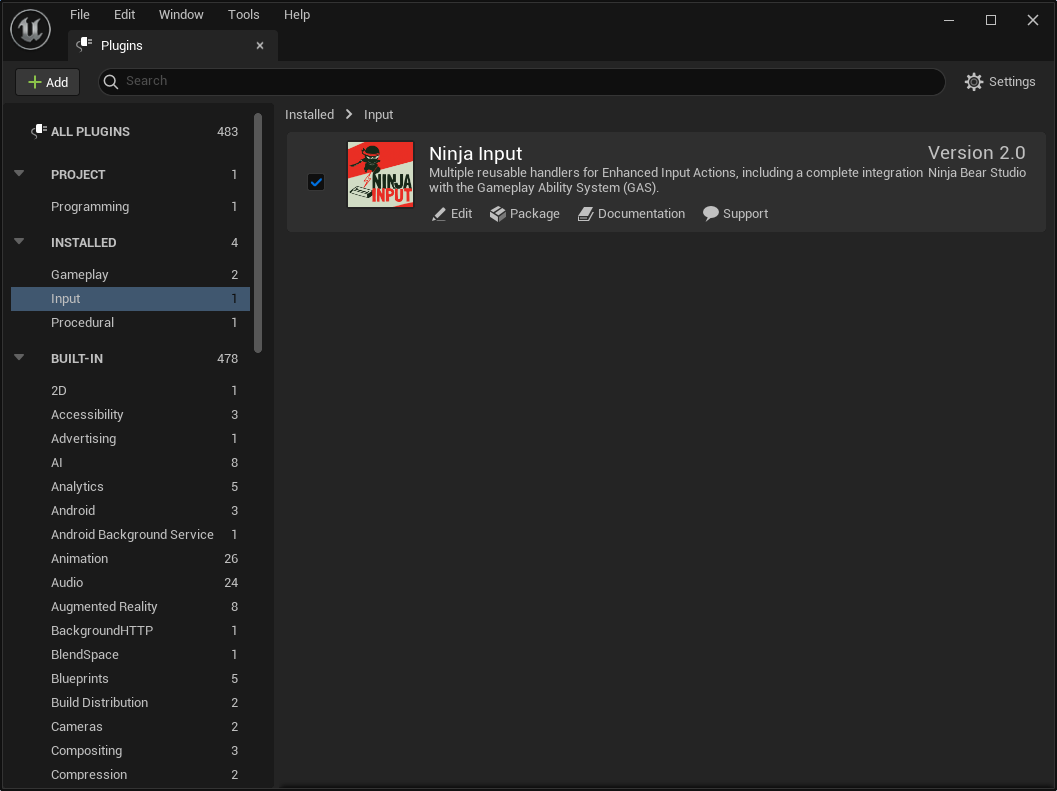
If you only want to use the plugin's classes, this is enough. However, If you want to access default Input Actions,
Mapping Contexts and Input Setups provided by the plugin, then you need to enable the option in the Content Browser (Settings > Show Plugin Content).
Register the Input Manager Component
Let's assign the Manager Component to your Pawn/Character or Player Controller. That can be done either via Blueprints or C++.
Additional Steps for C++ Setup
If you plan on using the Manager Component or creating Input Handlers using C++, please make sure to add
the appropriate dependencies to your Build.cs file.
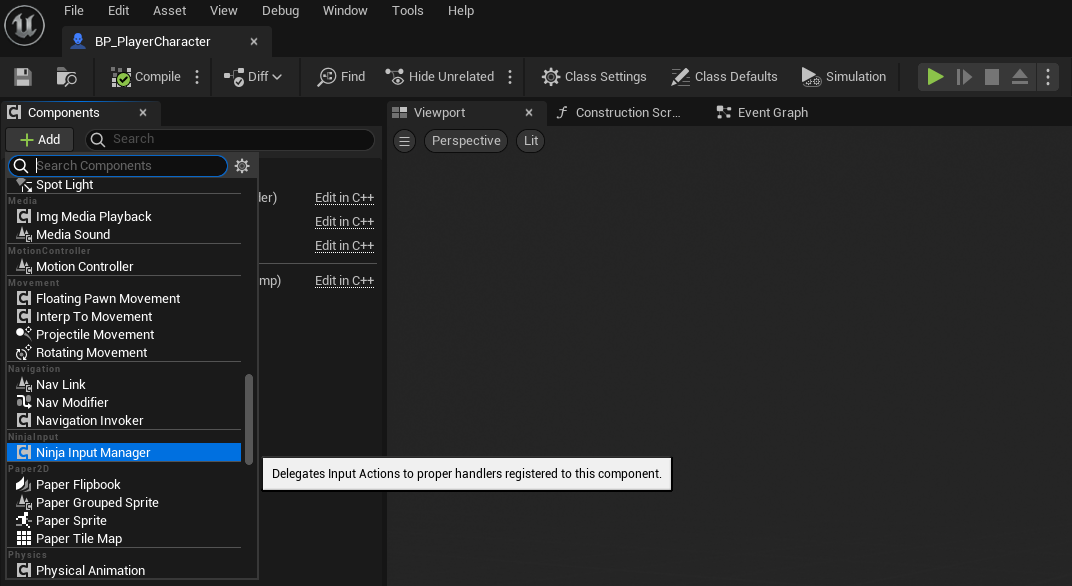
// ----------
// .h
public:

    ANinjaPlayerCharacter();

private:

    UPROPERTY(EditDefaultsOnly, BlueprintReadOnly, Category = "Components", meta = (AllowPrivateAccess))
    TObjectPtr<UNinjaInputManagerComponent> InputManager;

// ----------
// .cpp
#include "Components/NinjaInputManagerComponent.h"

ANinjaPlayerCharacter::ANinjaPlayerCharacter()
{
    InputManager = CreateDefaultSubobject<UNinjaInputManagerComponent>(TEXT("InputManager"));
}
public MyGame(ReadOnlyTargetRules target) : base(target)
{
    PCHUsage = PCHUsageMode.UseExplicitOrSharedPCHs;
    PublicDependencyModuleNames.AddRange(new []
    {
        "Core",
        "GameplayAbilities",
        "GameplayTags",
        "GameplayTasks",
        "InputCore",
        "NinjaInput"
        // ...
    });
}
Create the Input Setup Data
Next we should create an Input Setup Data that will aggregate any Input Mapping Contexts and Input Handlers. They represent the data structure needed by the Manager Component to add or remove contexts/handlers.
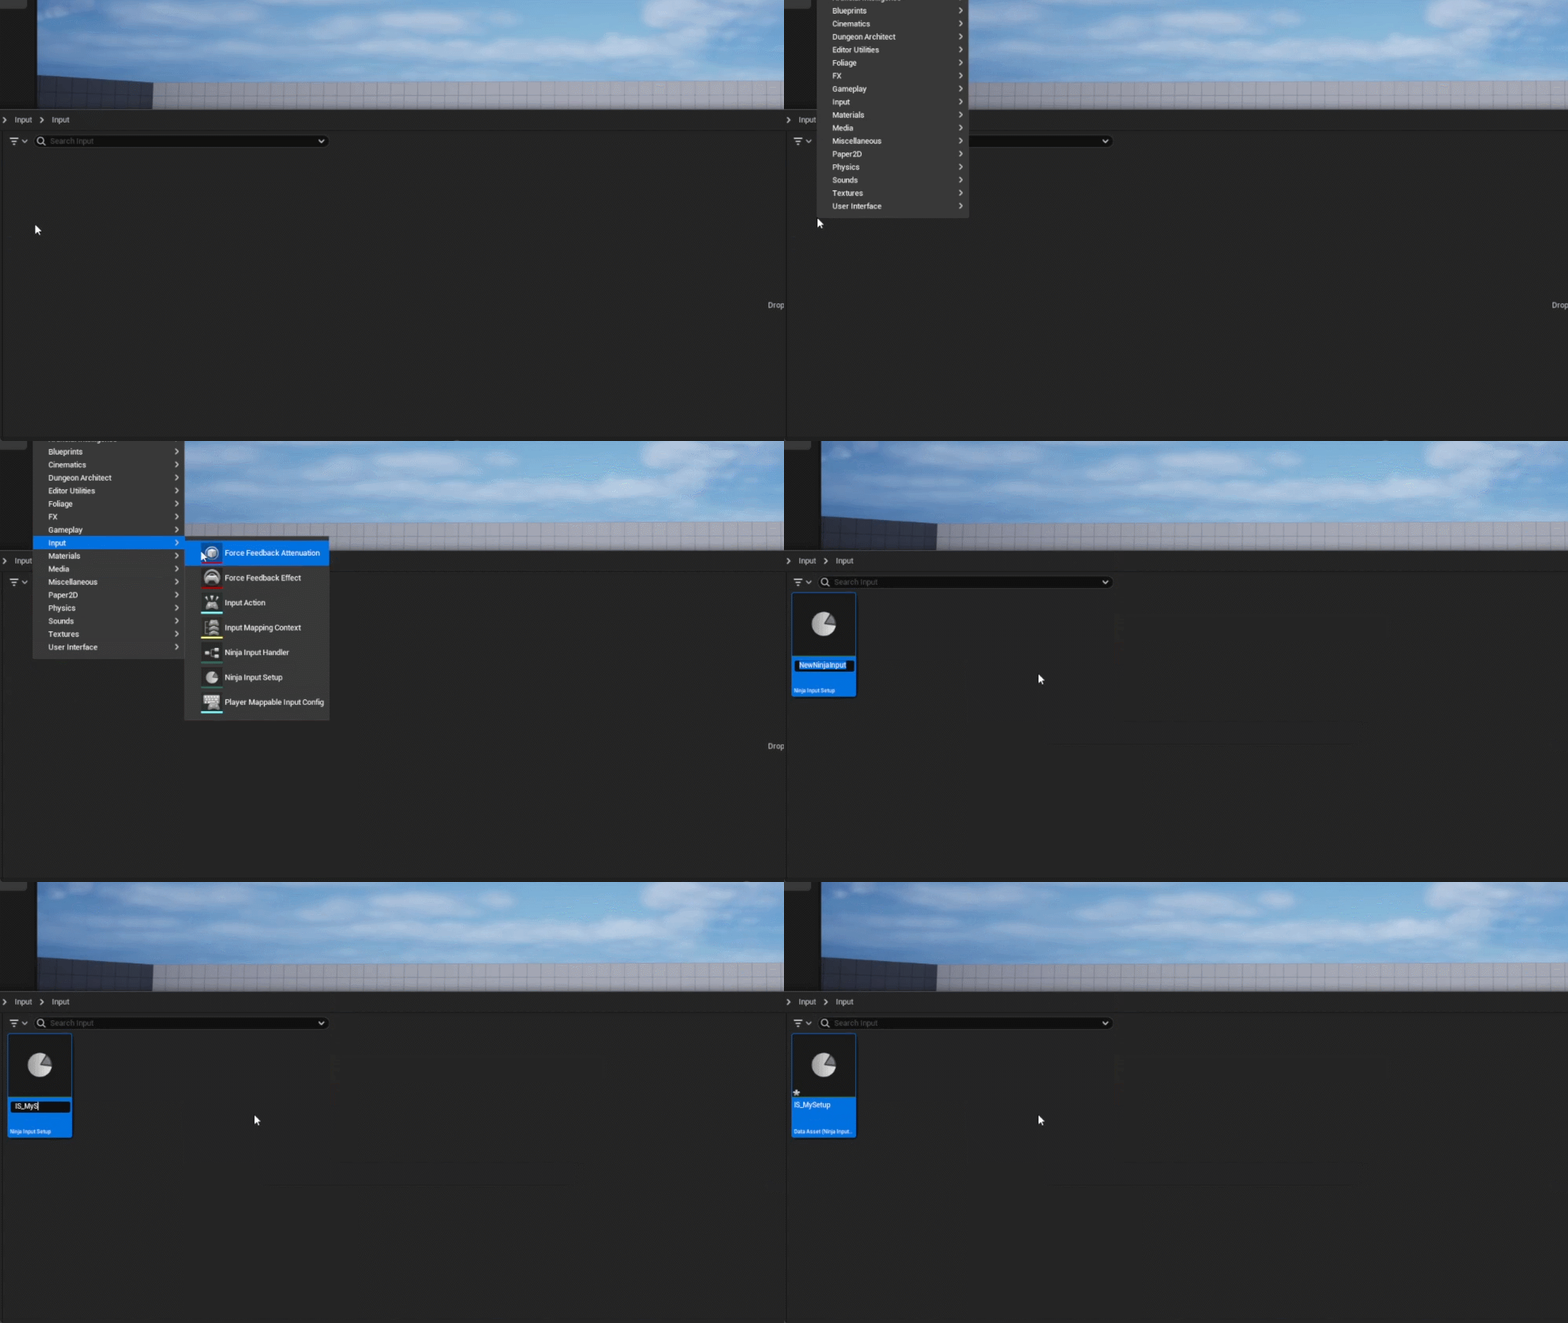
Alternativelly, you can start using or copying the default Input Setup provided, named IS_NinjaInput, which can be found
in the plugin's Content Folder!
We'll discuss this file later on, in deeper detail, but please see below an example of a fully-configured file that uses only default Handlers provided by the Ninja Input Plugin and a custom Input Mapping Context.
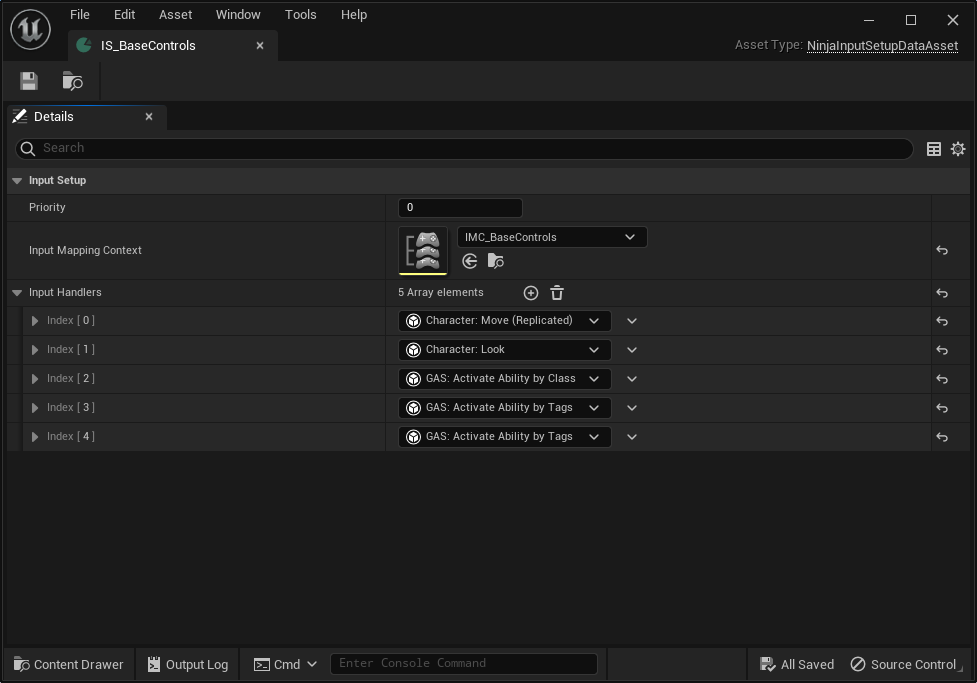
Once again, remember that the Input Mapping Context provided by this Data Asset must be unique to the Input Component. Duplicates will be discarded. Keep this in mind, as this is particularly important when you add the Input Component to your Controller and decide to add bindings to your pawn. If you have a similar setup, then you have to make sure to remove these bindings as well, once the pawn is unpossessed!
Since version 2.1, the Data Asset can be validated on save and the following checks are performed:
- The Input Mapping Context was provided.
- Input Handlers were provided.
- Provided Handlers have at least one Input Action and one Trigger Event.
- There are no empty entries in the Handler List.
- All Actions present in the Input Mapping Context have at least one Handler in the setup list.
Matching Action with Handlers is Optional
The system was designed to have an atomic Data Asset for setup, meaning that an Input Mapping Context should be added along with all Handlers necessary to deal with it. But if that's not a valid design for you, you can disable the matching of Actions and Handlers in the Settings Page.
The Data Validation is Optional Too
If you prefer the thrill of not having validations enabled and fending for yourself in the wilderness of potential data configuration errors, then by all means, you can also disable the Data Asset validation in the Settings Page!
Assign the Setup to the Component
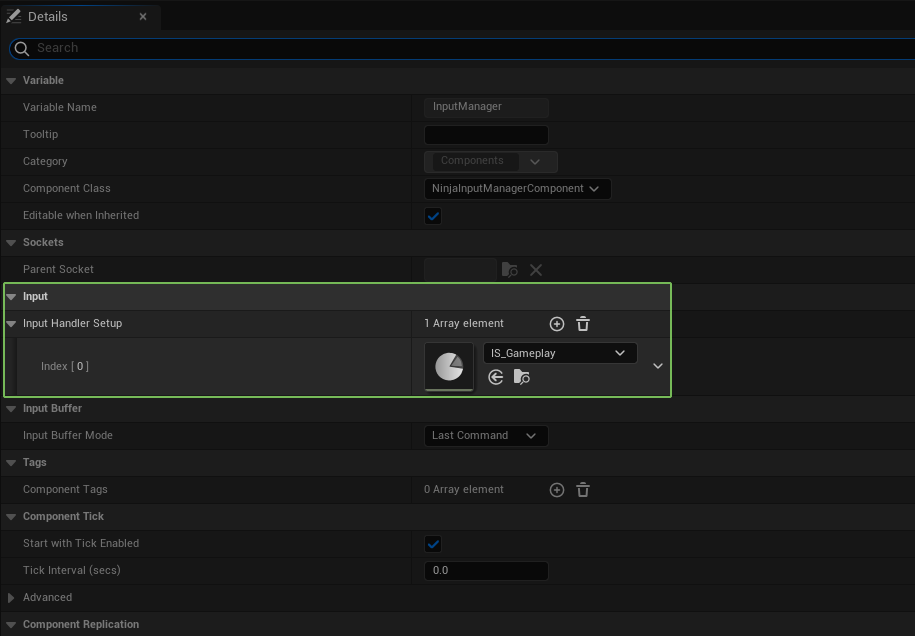
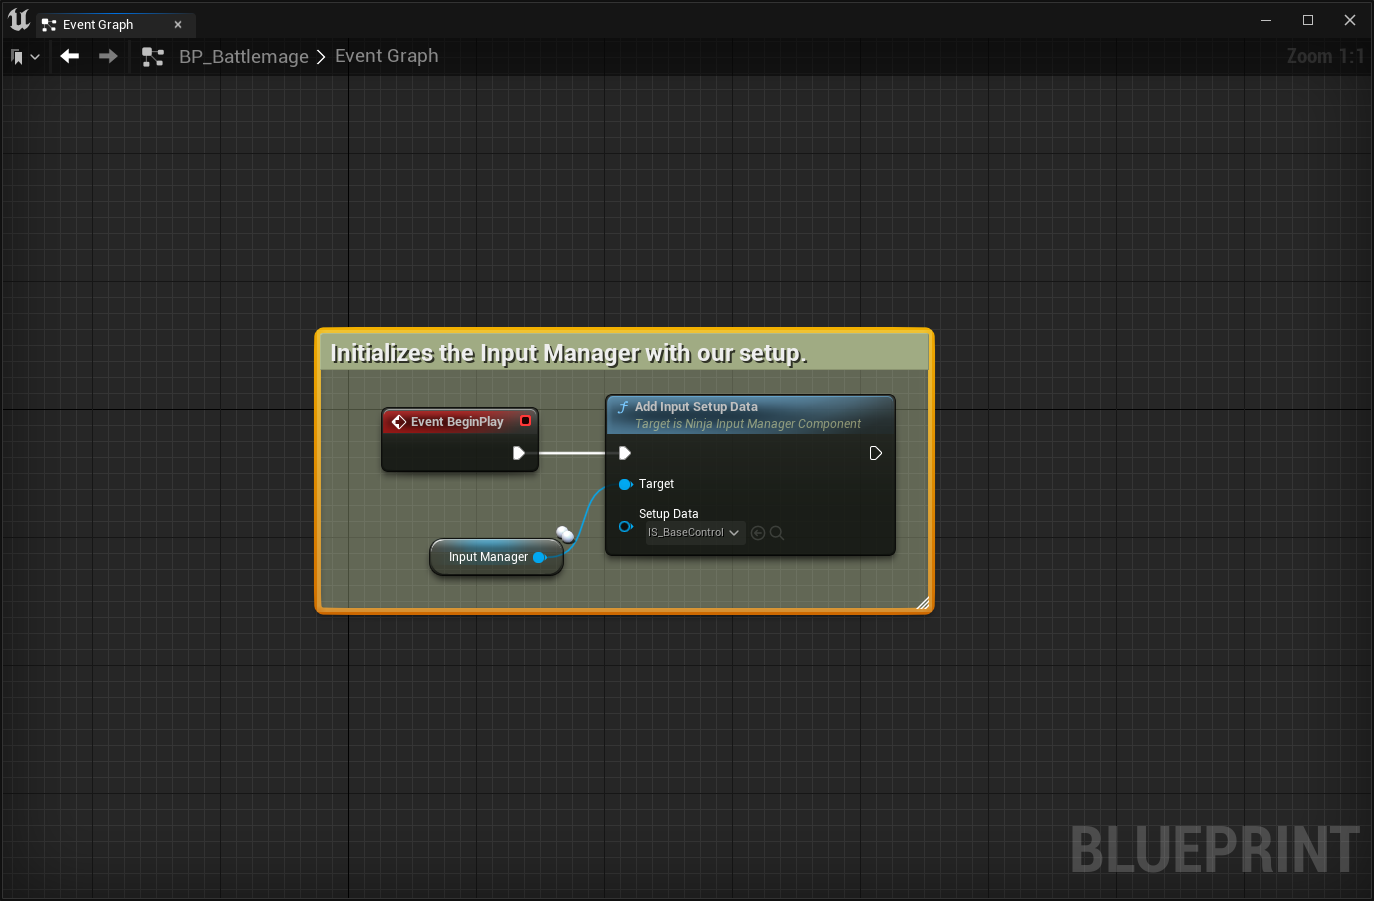
You can assign one (or many) Input Setups to the Manager Component, either using the Component Details Panel or using the appropriate Function, which we'll cover in more details during the Input Manager Component Chapter.
// ----------
// .h
public:

    virtual void BeginPlay() override;

protected:

    /** Loaded via defaults, maybe in constructor or from a subclass. */
    UPROPERTY(EditDefaultsOnly, BlueprintReadOnly, Category = "Input")
    TObjectPtr<UNinjaInputSetupDataAsset> SetupData;

// ----------
// .cpp
#include "NinjaInputManagerComponent.h"
#include "Data/NinjaInputSetupDataAsset.h"

void ANinjaPlayerController::BeginPlay()
{
    Super::BeginPlay();
    InputManager->AddInputSetupData(SetupData);
}
// ----------
// .h
public:

    virtual void PossessedBy(AController* NewController) override;

protected:

    /** Loaded via defaults, maybe in constructor or from a subclass. */
    UPROPERTY(EditDefaultsOnly, BlueprintReadOnly, Category = "Input")
    TObjectPtr<UNinjaInputSetupDataAsset> SetupData;

// ----------
// .cpp
#include "NinjaInputManagerComponent.h"
#include "Data/NinjaInputSetupDataAsset.h"

void ANinjaPlayerCharacter::PossessedBy(AController* NewController)
{
    Super::PossessedBy(NewController);
    InputManager->AddInputSetupData(SetupData);
}
Finding the property faster
You may have a few categories in the component. It might be faster to just use the search bar at the top of the Component's
Details panel and search for Input Handler Setup!
Caveat for BeginPlay usage
When assigning your Input Manager to a Controller, this is not so much of an issue. However, if you are assigning your component to the Pawn, using BeginPlay might be tricky since, on BeginPlay, the Controller might have not been assigend yet.
Since version 2.3, the plugin has a feature to cache such requests and handle them properly when the controller is assigned, but in any case, for pawns, you may want to connect to the "possess" event instead.
Add a Forward Reference (Top-Down/Twin-Stick movement)
Third-Person or First-Person perspectives
For other perspectives, Third-Person or First-Person, this is not necessary and you can skip this step! This is only relevant for the Move, in a Top-Down/ Twin-Stick setup.
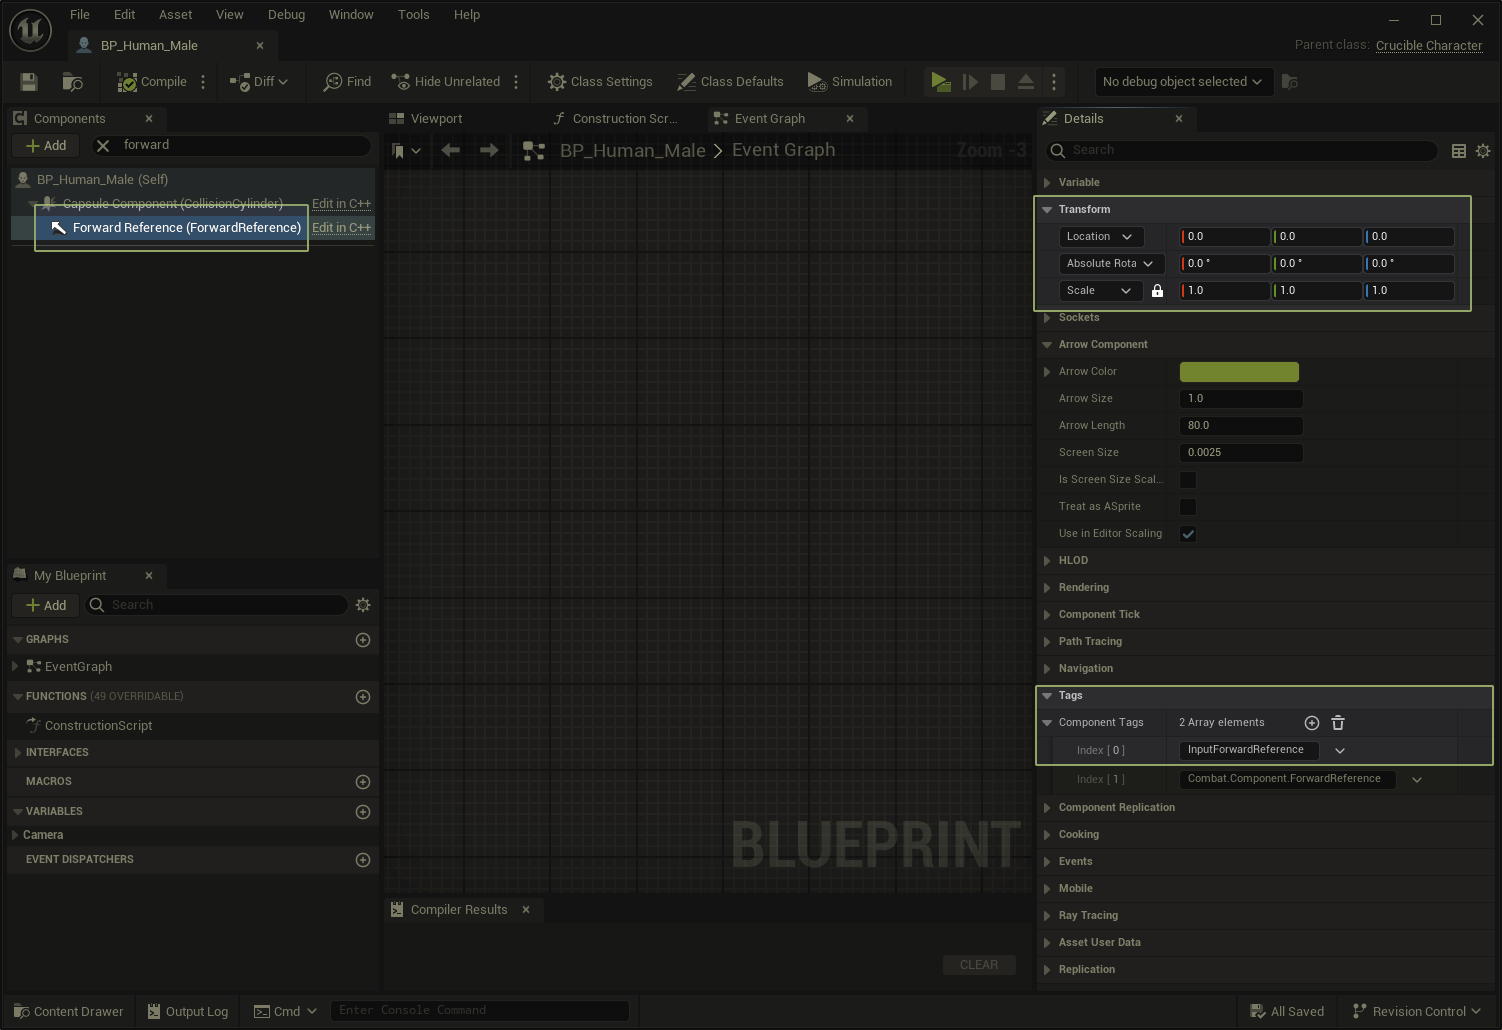
For top-down/twin-stick movement, the character usually needs a forward reference that always points "forward", regardless of the character's rotation. For this purpose, we'll use an Arrow Component.
- Create an Arrow Component in your Character class.
- Set the parent as the Character's Capsule (root component).
- Set the Arrow Component's to use Absolute Rotation.
- Add the expected Tag to this component:
InputForwardReference.
// ----------
// .h
public:

    ANinjaFrameworkCharacter(const FObjectInitializer& ObjectInitializer = FObjectInitializer::Get());

private:

    UPROPERTY(EditDefaultsOnly, BlueprintReadOnly, Category = "Components", meta = (AllowPrivateAccess = true))
    UArrowComponent* ForwardReference;

// ----------
// .cpp
#include "NinjaInputManagerComponent.h"
#include "Data/NinjaInputSetupDataAsset.h"

ANinjaFrameworkCharacter::ANinjaFrameworkCharacter(const FObjectInitializer& ObjectInitializer) : Super(ObjectInitializer)
{
    ForwardReference = CreateDefaultSubobject<UArrowComponent>(TEXT("ForwardReference"));
    ForwardReference->ComponentTags.Add(UNinjaInputManagerComponent::ForwardReferenceTag);
    ForwardReference->SetVisibleFlag(false);
    ForwardReference->SetUsingAbsoluteRotation(true);
    ForwardReference->SetWorldRotation(FRotator::ZeroRotator);
    ForwardReference->SetArrowColor(FLinearColor::Green);
    ForwardReference->SetAutoActivate(true);
    ForwardReference->SetupAttachment(GetRootComponent());
}
Adjust the Ninja Input Settings (Optional)
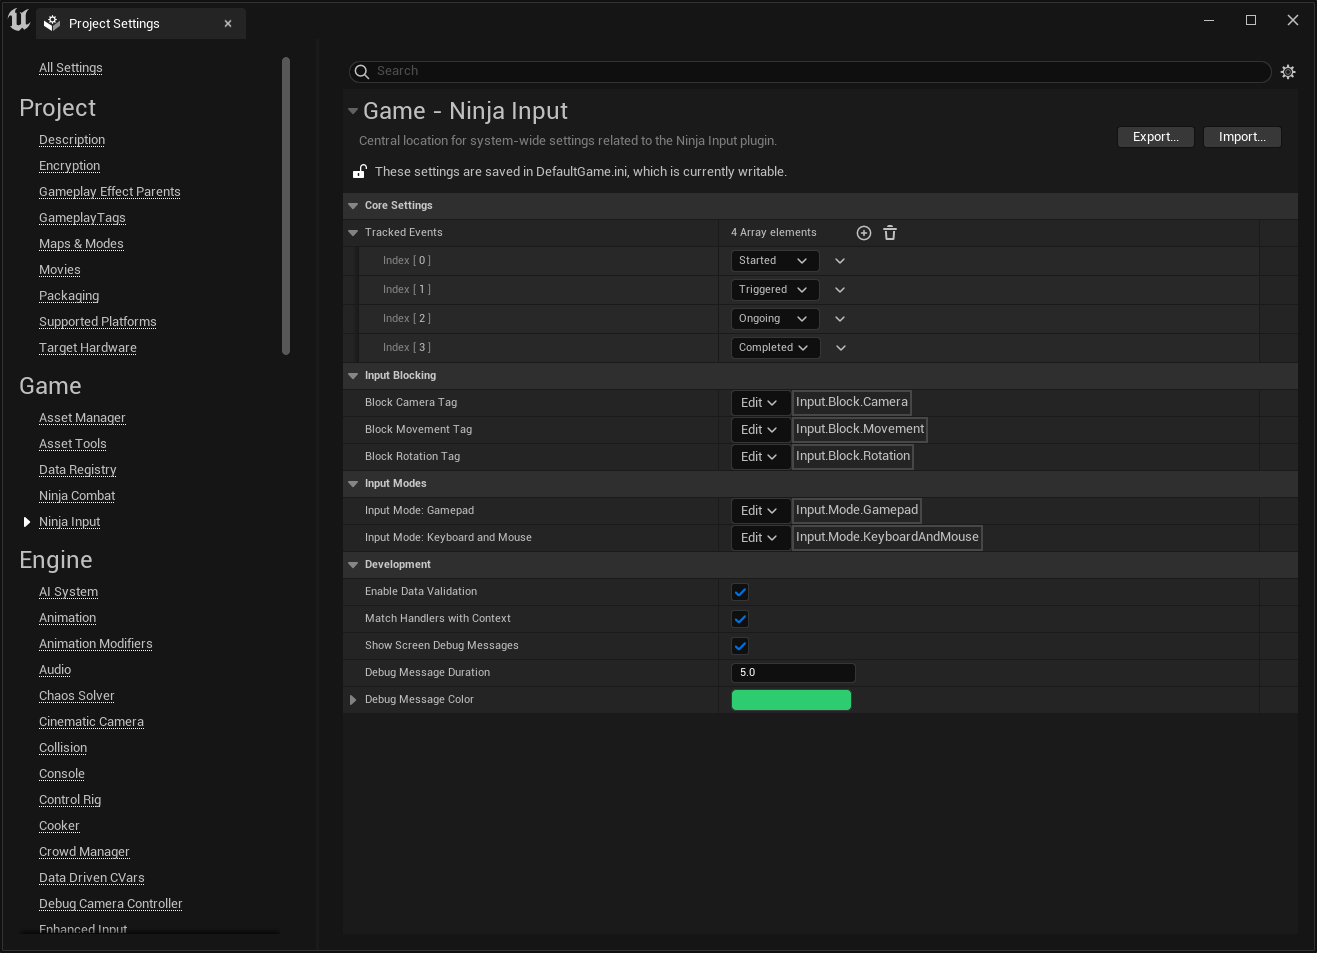
You can find global Developer Settings in your Project's Settings pannel. These can be used to modify common behaviour or
to enable the global Input Debug. To access it, please go to Edit > Project Settings and navigate to Ninja Input, on the left pannel.
| Setting | Description |
|---|---|
| Tracked Events | Events from the Enhanced Input that will be tracked Input Manager Components. These should suffice for most cases, as long as the correct Input Triggers are used. |
| Input Blocking | Gameplay Tags used by movement handlers to check if movement/camera/rotation should be blocked. |
| Input Modes | Gameplay Tags used to identify categories of player input (Keyboard and Mouse, Gamepad). |
| Enable Data Validation | Enables the data validation for the Setup Data Asset. Highly recommended to leave it on! |
| Match Handlers with Context | If enabled, ensures that all Actions in the Context will be matched with the Handlers. |
| Show Screen Debug Messages | If enabled, will print a message to the screen informing that a certain Handler as activated. Useful to ensure Handlers are being called. |