Implementing Weapons
Weapons can be represented in many ways in games. The system is defined to support multiple designs, including systems without any weapons at all. Here are some examples of design choices compatible with the system:
- Hand-to-Hand combat.
- The character has weapons, which are part of the main character mesh itself.
- The character has weapons, which are represented by meshes attached to it.
- Weapons are represented by Actors, attached to the character.
There's no lock-in and you don't need to decide or stick to one of these. Once again, the system supports all these strategies and you can mix them as needed.
For the first scenarios, there's not much else that needs to be done right now and you can continue to the Melee and Ranged Combat sections. They will go into more details regarding the setup to implement such functionalities.
However, if your weapons are implement as Actors, then please read on to know more about how these can be integrated into the system, via the Weapon Manager Component.
Here's how weapon actors are managed and integrated to the system.
    sequenceDiagram
        ExternalComponent->>WeaponManager: weapon query
        activate WeaponManager
            WeaponManager->>WeaponManager: find weapon
            WeaponManager->>ExternalComponent: weapon actor
        deactivate WeaponManager
Weapon Implementation
First, any actor representing a weapon must implement the CombatWeaponInterface. This interface provides
is used to make a weapon "visible" to the system, but won't interfere with the way it operates, since this
is something specific to each project. As usual, this interface can be implemented in Blueprint or C++.
A weapon's visibility is defined by the presence of this interface and the Gameplay Tags used to define the
weapon, with characteristics that are relevant to your weapon and where it's equipment, for example Sword,
Crossbow, LeftHand, RightHand, etc.
You can also use the base Actor, NinjaCombatWeaponActor. It provides the structure to define Weapon Tags via
the class' default properties. This class is very lean and should be a good "white canvas" for your system.
Interface versus Base Class
Both are valid choices. Usually you'll have to implement the interface if you already have a class hierarchy for your weapons, which is something that could happen if you are using an Equipment System.
Weapon Functionality
Concepts such as Melee and Ranged combat are defined by their own interfaces and functionality. These are separate from the Weapon Interface, but can (and most likely will) be added to Weapon Actors, as needed.
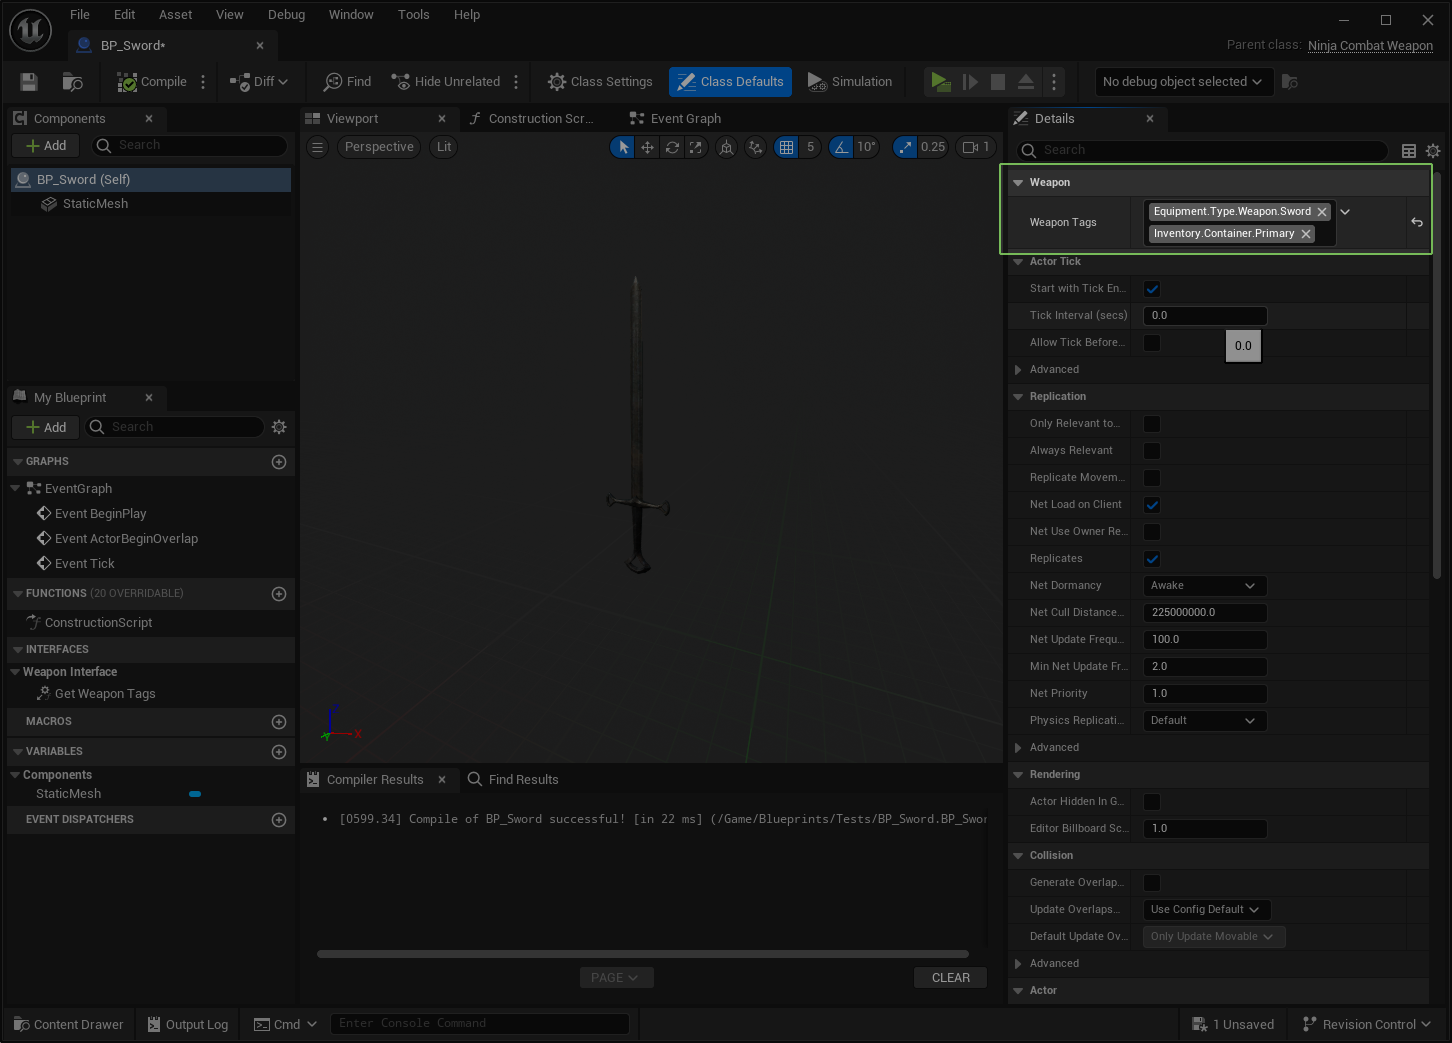
To wrap it up, let's create a Sword using the base Weapon Actor.
- First, create a new actor, extending from the
NinjaCombatWeaponActor. - Feel free to add a Static or Skeletal Mesh component, adding any asset you find appropriate.
- For Weapon Tags, here we'll define a weapon type and a slot that this weapon occupies, in this case, we are
using the tag
Inventory.Container.Primary.
Keep in mind that these tags are defining an equipped weapon, so the Gameplay Tags should reflect this, and also where a weapon is equipped, in case you can have two weapons of the same type at the same time.

Additional Weapon Interfaces
Like mentioned above, the main interface that defines a weapon in the system is the CombatWeaponInterface.
This interface will be used by the Weapon Manager Component, which we will discuss below, to find/interact
with weapons.
However, there are two other interfaces that you should know about. They may or may not be used in your
weapons, depending on your system design. These are the CombatMeleeInterface and CombatRangedInterface
The CombatMeleeInterface is responsible for providing the Mesh used for Melee Scans and you can learn
more about this functionality in the Melee Combat page. As for the CombatRangedInterface,
this interface is responsible for providing the Mesh from which a projectile should be launched and you
can learn more about this functionality in the Ranged Combat page.
Add them as necessary!
These interfaces are not implemented by the NinjaCombatWeaponActor as the system will not assume
that design. If your weapons are indeed performing melee scans (like a sword) or launching projectiles
(like a staff), then you should implement these interfaces as needed.
Weapon Manager Component
The Weapon Manager Component is responsible for providing all weapons currently available to a combatant.
This component implements the CombatWeaponManagerInterface, including its most relevant function, GetWeapon,
which searches for available weapons using Gameplay Tag Queries.
There are two implementations of the Weapon Manager in the system, the Default Weapon Manager and the Equipment Weapon Manager. The former is a simple implementation that provides basic functionality to manage active weapons and the latter is an Adapter to the Ninja Inventory Equipment Manager.
Default Weapon Manager
The default weapon manager, NinjaCombatWeaponManagerComponent, is an implementation that relies on a replicated
weapon array to track weapons available to a combatant. On top of the interface implementation, provides methods
that can be useful for simpler scenarios.
- Add initial weapons by their classes, in the component's Default panel.
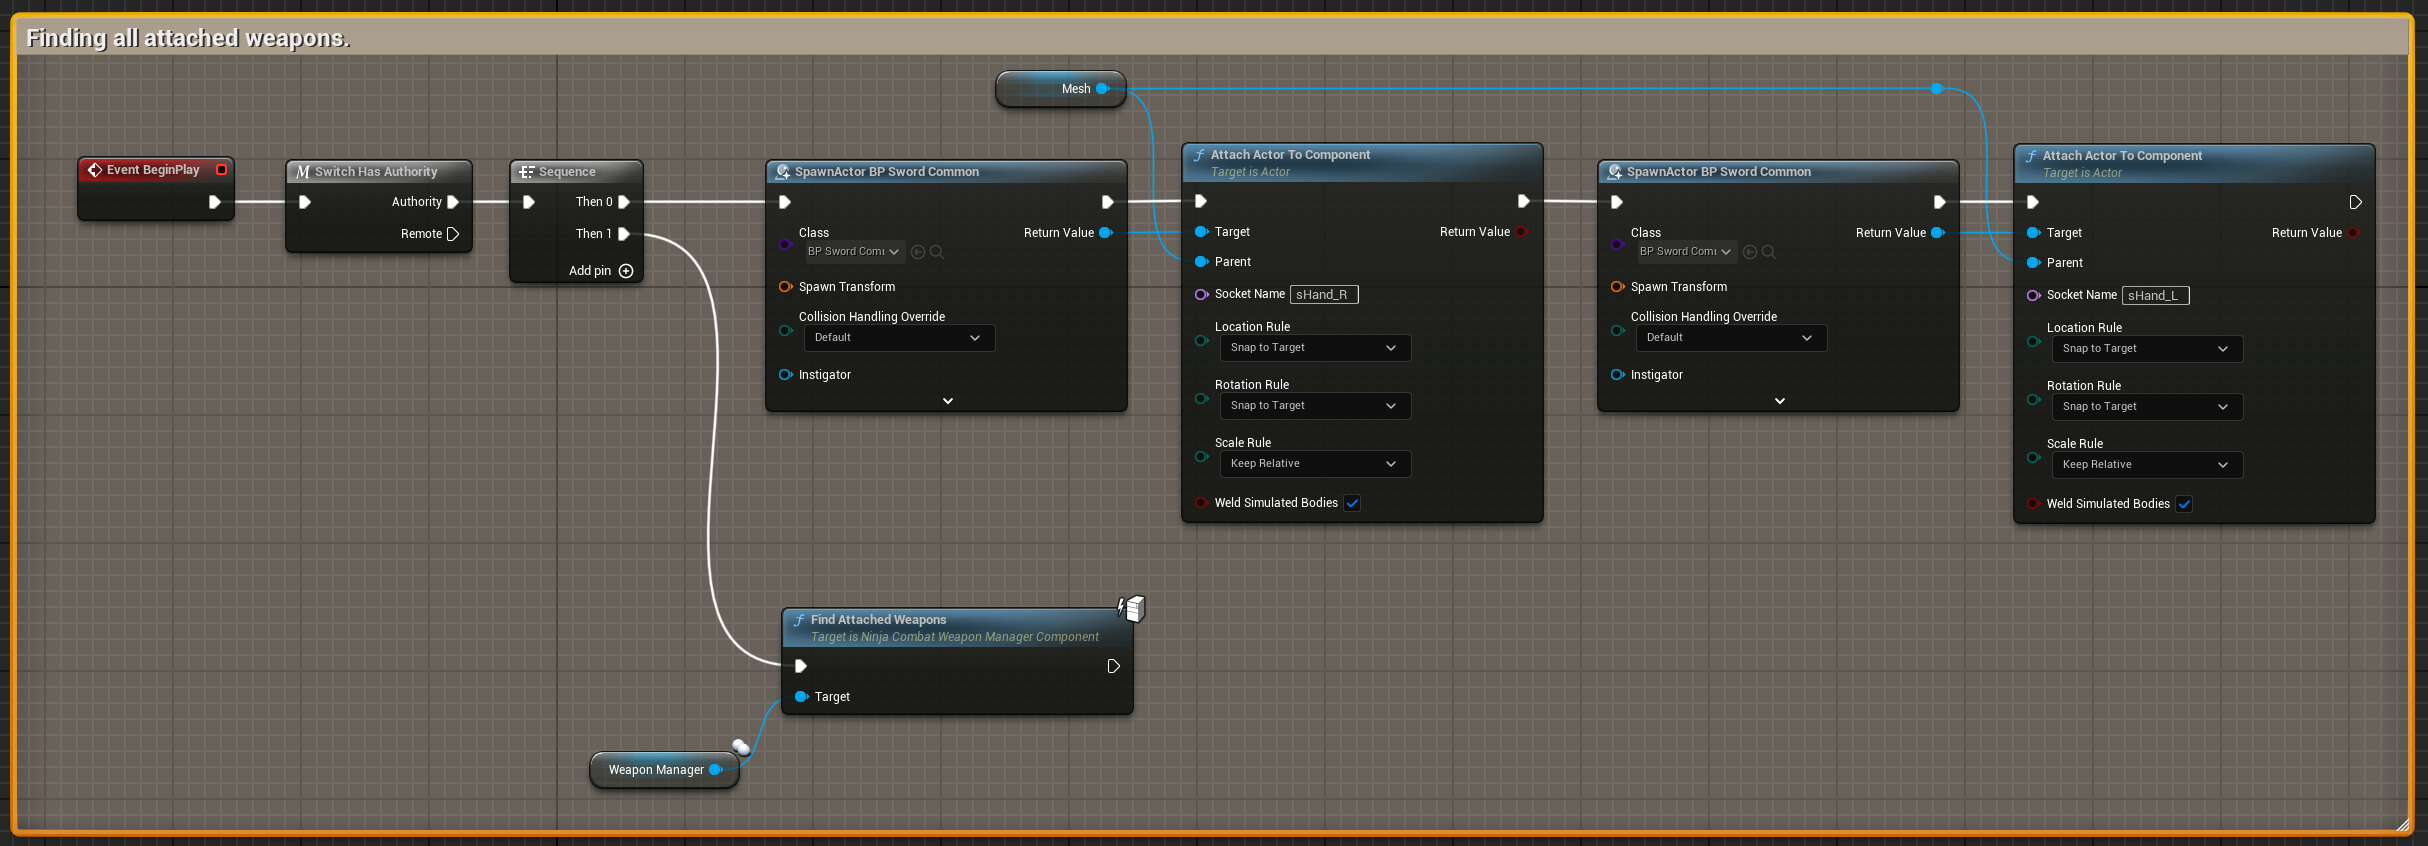
- Scan attached actors that are valid weapons, when the component initializes.
- Add or remove weapons via the appropriate functions,
AddWeaponandRemoveWeapon.
Here's an example of how to register a Weapon Actor that has been manually initialized:

Weapon Validations
The AddWeapon function (and its RemoveWeapon counterpart) will require a valid actor that implements the
CombatWeaponInterface. It will also warn you if you try to add duplicates or remove unregistered weapons.
You can also request the component to scan and collect all weapon actors attached to the owner. This might be useful if you are manually spawning a few weapon actors, such as a sword and a shield.

Automatic Scan
As the component initializes, it will perform a scan for actors that are already attached to the owner. Attached actors will take priority over ones that are spawned via classes set in the component's Defaults.
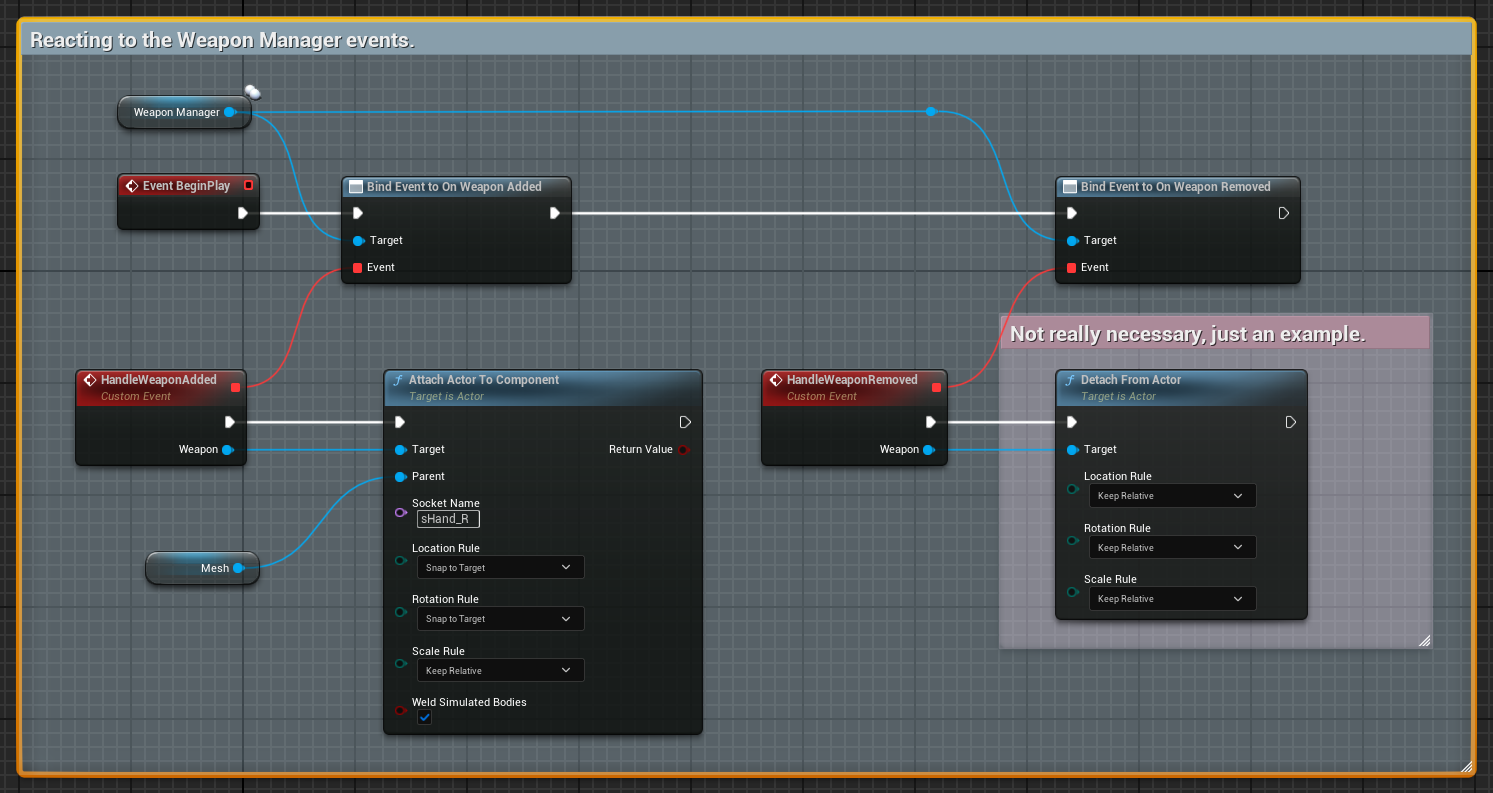
Finally, you can also subscribe to delegates that will broadcast weapons that were added or removed.

This component does not provide any methods to manage weapon "states". That is usually the responsibility of another domain, such as Inventory or Equipment. You need to keep this in mind to decide if you want to use this default Weapon Manager, if you need to build a specialized one that better fits your needs, or if you are integrating with the Ninja Inventory.
Equipment Weapon Manager
The Equipment Weapon Manager, NinjaCombatEquipmentManagerComponent, works as an Adapter between the Combat and Inventory System.
This class is only operational if the Inventory System is detected in the project's Plugin folder, or installed in the Engine. However, it should still be considered as reference, in case you want to see how a proxy like this could be implemented.
Weapon Summary
Here's a summary of all the types that were introduced in this section:
| Type | Description |
|---|---|
CombatWeaponInterface |
Interface that defines a weapon and how to identify it. |
CombatMeleeInterface |
Interface that that can be added to your weapons if they are performing melee scans. |
CombatRangedInterface |
Interface that that can be added to your weapons if they are launching projectiles. |
CombatWeaponActor |
Base implementation of WeaponInterface. Implements ICombatWeaponInterface. |
CombatWeaponManagerComponent |
The default Weapon Manager used by the system. |
CombatEquipmentManagerComponent |
The Weapon Manager that provides an integration with the Ninja Inventory. |
WeaponManagerInterface |
Interface that defines the Weapon Manager. |