Integration: Input and Combat
The Ninja Combat framework requires inputs using the Enhanced Input system, which is now the standard input system for Unreal Engine. So if you have the Ninja Input also installed, then you can use it to trigger Abilities and easily configure inputs for the Combo System.
Triggering Abilities
As you can see in more details, in the dedicated pages of the Ninja Input framework, it is possible to activate and interrupt Gameplay Abilities using any of the conventional activation methods, such as Gameplay Tags or Ability Classes.
No additional steps are necessary to use these Input Handlers with the Combat System. Just make that, if you choose to use Gameplay Tags for activation, these Gameplay Tags are matching between the Input Handler and the Combat Ability that you are trying to trigger.
Combo System
The Combo System has two important requirements related to the player Inputs:
- Input Actions must be mapped to certain Combo Events, using the appropriate Data Asset.
- An Input must first activate the Combo Ability and once that ability is active, it must send Gameplay Events to the ability, containing each Input Action in the event's payload.
For the first requirement, that is quite straightforward since it is a simple ability activation. Once again, you just have to make sure that the activation strategy is cohesive with the granted combat ability.
As for the second requirement, that where the Ninja Input framework can really simplify things for you. In your Ability Activation Input Handler you can choose to send Gameplay Events if an Ability is already active, which is exactly what Combo System expects the Input to do. Furthermore, the Ninja Input will already add the Input Action to the event's payload, as expected by the Combo System.
Input Buffer
Another interesting and useful aspect from the Ninja Input framework that can be useful for a Combat System is its Animation-Driven Input Buffer. This allows you to buffer a player input that can be triggered later, when appropriate.
A common example for that would be when the player is performing an Evade and that is a commited action. The player can only perform another action, like an attack, when the Evade is over. The input buffer can be handy, allowing you to allocate certain frames in the animation to the buffer and, if the Attack input is pressed during that window, it will be actually triggered as soon as the buffer window is completed.
Forward Reference
The Combat System requires a Forward Reference and depending on your project's perspective, the Input System may also require one too. Both systems were designed in a what that you can use the same forward reference for both of them.
All you need to make sure is that the forward reference is properly provided, using the proper Component Tags from both setups, and returning this reference as expected, via the proper Combat Interface.
On the other hand if you don't need the Forward Reference for the Input System, simply create the Arrow Component
as expected by the Combat System's Initial Setup without
adding the Component Tag for the Input System, InputForwardReference defined via UNinjaInputManagerComponent::ForwardReferenceTag.
Example of Input Handlers
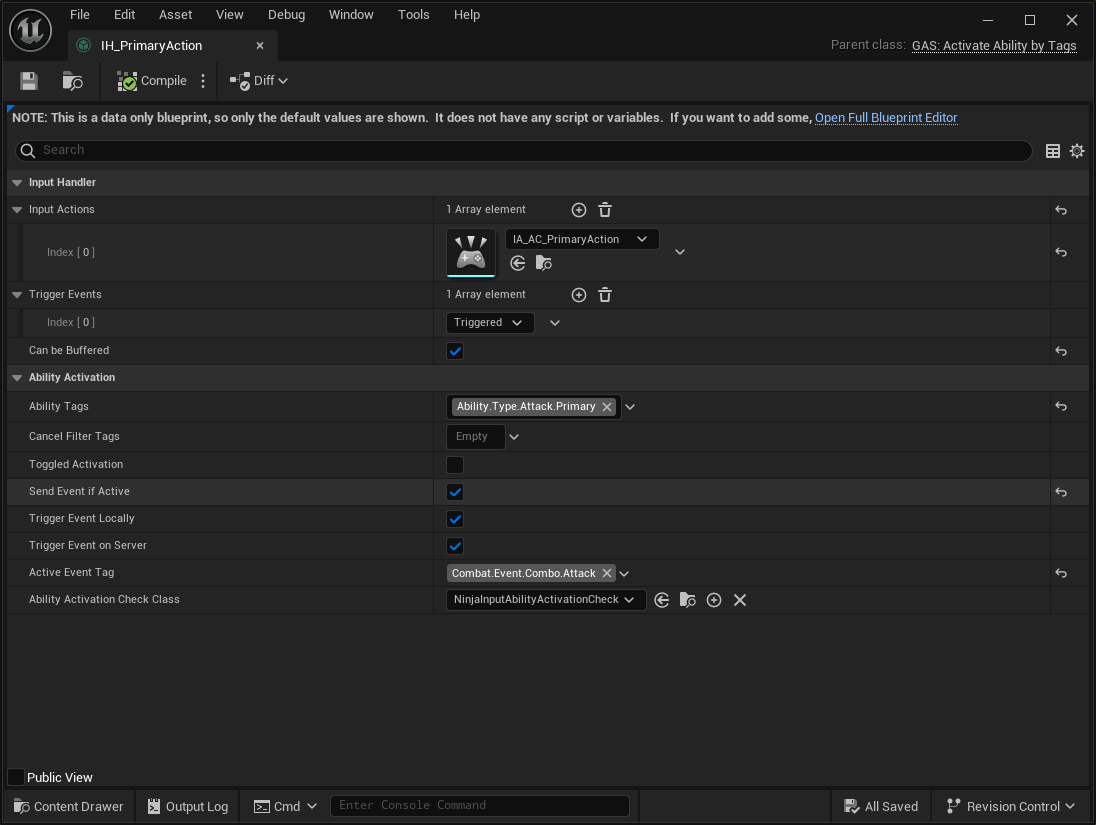
Let's breakdown an Input Handler fully configured, including all topics we just discussed.

-
This Handler extends the Ability Activation by Gameplay Tags. This means the
Ability.Type.Attack.Primarytag must also be set in the Gameplay Ability, which is already granted to the owning character. -
The option
Send Event if Activeis enabled, meaning that after the first input, when the Ability is activated, further inputs will check if the ability is active and if so, they will trigger Gameplay Events instead. These events are sent both locally and in the dedicated server, which is desirable for our case. -
Then we must ensure that the
Active Event Tagis properly set to the value expected by the Combo System, which isCombat.Event.Combo.Attackby default. This event will contain theIA_AC_PrimaryActionasset in the Payload, as expected by the combo system.
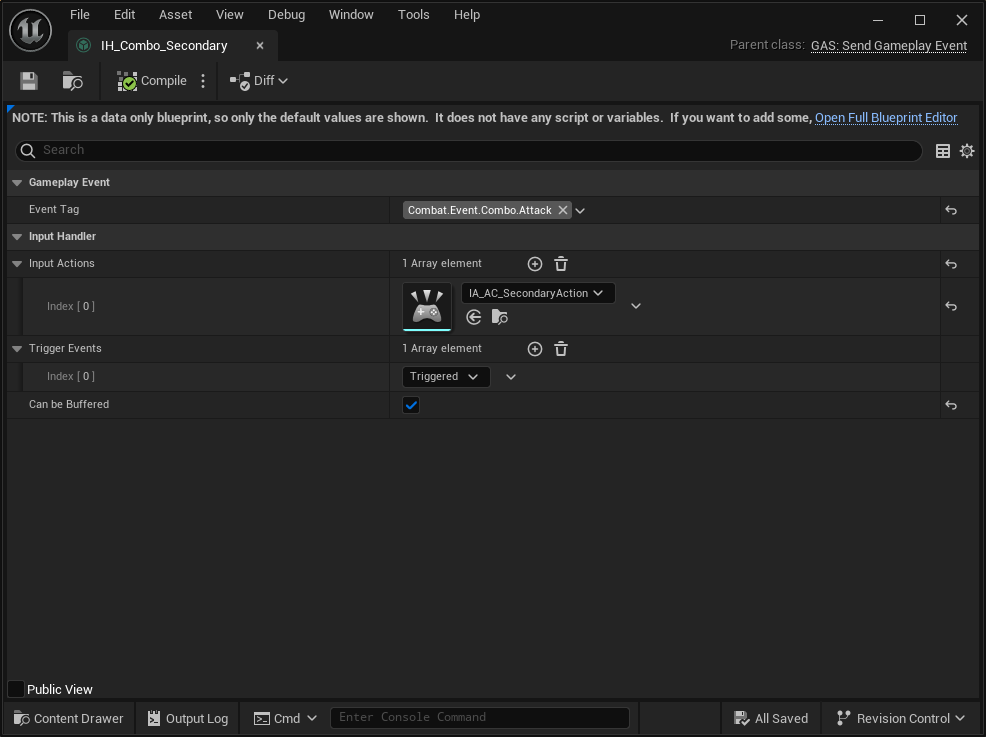
Now let's say that you have other inputs that should also trigger events when a Combo is active. For these cases
you can simply use the Send Gameplay Event Handler, instead of an Activation one.

Once again, we are sending the same Gameplay Event, Combat.Event.Combo.Attack. As expected, this Input Handler
will also send the Input Action in its payload. In this case, IA_AC_SecondaryAction.
Multiple Handlers for the same Action
Now, an interesting point to make here is that we have yet another Input Handler, for an Ability Activation, also
connected to the IA_AC_SecondaryAction. But the ability connected to the input is set to be blocked when the
Primary Ability (the combo) is active. This makes this setup very flexible!
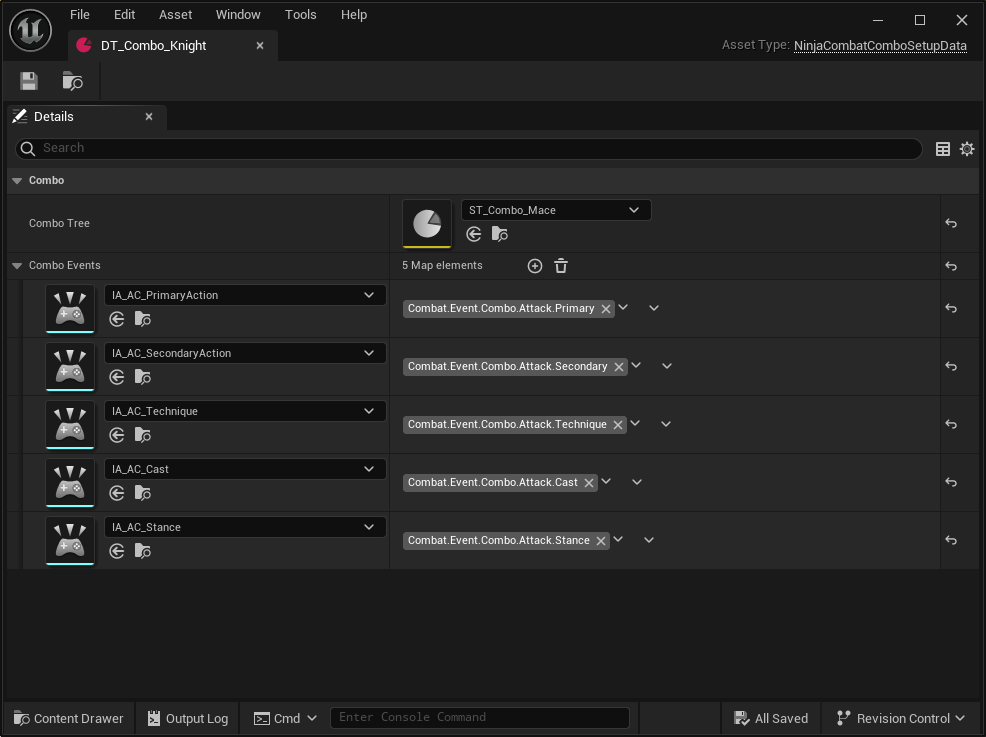
You can have many events triggered for multiple actions in your game. Once all your Handlers are configured, make sure to map them to your Combo Data Asset, so your State Tree can properly react to them!
Make sure to check the Combo System page
This is covered in details in the Combo System page, so make sure to check that page again if you need a refresher on the topic!

In this example, you can see our previously mapped IA_AC_PrimaryAction and IA_AC_SecondaryAction, plus some other
Input Actions mapped too. They are mapped to specific Gameplay Tags related to Combo Events, such as Combat.Event.Combo.Attack.Primary
and Combat.Event.Combo.Attack.Secondary.
The Combo Manager will send these events, based on the Input Actions and the State Tree can then react to such events. This part of the workflow is obviously transparent to the end user, so you only need to configure your assets properly.